Placeholder Content Image

Easiest travel hack to save big on the cost of flights

<p>Planning your upcoming holiday and haven't nailed down your flight bookings just yet? Well, hold off a bit because there's an optimal strategy to maximise your savings.</p> <p>A recent research study conducted by Expedia has unveiled a golden nugget of advice: Booking your flights on a Sunday can lead to substantial savings, potentially up to 20 percent off your airfare.</p> <p>This valuable insight is part of Expedia's 2024 Air Travel Hacks Report, which is packed with useful information to simplify your trip planning process.</p> <p>Let's dive deeper into this Sunday-saving strategy. When you compare booking your flights on a Sunday to the common practice of booking on a Friday, you'll likely discover substantial cost savings. Considering that average ticket prices have soared by approximately 20 percent compared to last year, any opportunity to trim your expenses becomes paramount.</p> <p>Now, you might be wondering how far in advance you should secure your flights for optimal savings. If you're embarking on a domestic adventure and have your travel plans locked in more than three months ahead, you're in a prime position to economise. The study's findings indicate that travellers who booked their domestic flights at least 14 weeks before departure managed to pocket an average savings of 20 percent compared to those who procrastinated until the 11th hour.</p> <p>On the other hand, if your journey is taking you across international borders, there's less need for anxiety. International fares typically exhibit a fair degree of stability during the six months leading up to your travel date. The sweet spot for booking your flights for an overseas escapade is ideally at least one month prior to departure. This early booking ensures both availability and the potential for cost-effective fares.</p> <p>Here's a summary of the Expedia report's findings:</p> <p><strong>Book on a Sunday to save up to 20% on average<br /></strong>Travellers who booked on Sundays instead of Fridays tended to save, on average, around 20% on domestic flights and international flights. The best day of the week to book has been Sunday, while the day to avoid has been Friday, for the past four years.</p> <p><strong>Book at least three months before domestic flights to save 30% on average<br /></strong>The sweet spot for snagging the best price on domestic flights falls between 70 – 100 days before departure (so about three months in advance of travel). Travellers who booked during that period saved 30% on average compared to those who waited until the last minute (0 – 30 days before travel).</p> <p><strong>Book six months before international flights to save 25% on average<br /></strong>Travellers who booked around six months in advance of international travel saved an average of 25% compared to those who waited until three months or less to book. The key to booking international airfares is to book as soon as possible, with prices traditionally cheapest 160 days or earlier before departure.</p> <p>So be sure to set an alarm or mark your calendar for a Sunday when booking your flights, and if you have long-term travel plans, secure your domestic flights at least 14 weeks ahead. For international journeys, booking a month before your departure date will help you make the most of your travel budget. Happy travels!</p> <p><em>Image: Getty</em></p>

Travel Tips

Placeholder Content Image

11 easiest dogs to train that make obedient pets

<h2>Most trainable dogs</h2> <p>Dogs are some of our most beloved animal companions. But not all breeds are the easiest dogs to train, and if they’re not well-behaved, they can be a huge source of stress. Without learning the basics, dogs can have all sorts of unwanted behaviours, like barking, pulling on the leash, destroying items in the house, and not socialising well with people or other animals. This sadly contributes to many pets being surrendered to animal shelters when their owners are no longer able to cope.<br />Proper training is essential for any pet, whether they’re going to be family companions, service dogs, emotional support dogs, or guard dogs. “Your dog needs to know basic obedience,” says dog trainer, Courtney Briggs. “‘Sit,’ ‘stay,’ ‘come,’ ‘off,’ and ‘down’ are all crucial skills you’ll need to have mastered before bringing your dog into unfamiliar environments with unfamiliar humans and activities.”<br />If you’re thinking of bringing a new pet into your life, first consider which breeds are the easiest dogs to train. Both instinct and intelligence play a role in how trainable an animal is. Certain breeds have been bred for hundreds of years to do specific activities, like herding, and it’s challenging to stop a dog from doing what it’s instinctually supposed to do. But with regular training, any pup – from the smartest dog breeds to slower learners – can learn the basics. So find a dog trainer and enrol your furry friends in obedience school when they’re young.<br />With positive reinforcement and consistency, your new puppies will become obedient, happy members of the family. And remember: regardless of breed, training a pup takes time, consistency, and patience, says Rob R. Jackson, co-founder and CEO of Healthy Paws Foundation and Healthy Paws Pet Insurance. Treats don’t hurt either.</p> 
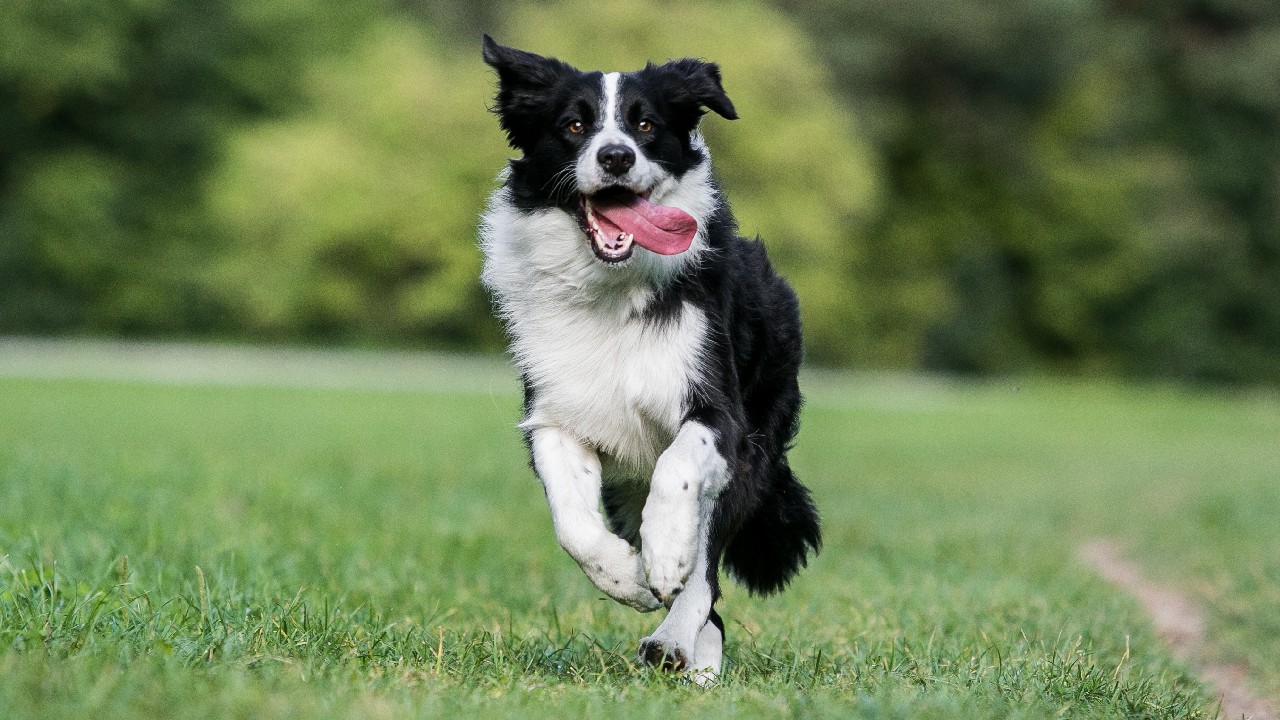
<h2>Border collie</h2> <p>Bred to be bright and energetic, border collies take their name from the border region of Scotland, where the breed was developed, and the Scottish word for sheepdog: collie. These agile, intelligent dogs are practically athletes when it comes to herding and are no doubt smarter than you think. So impressive are the pups that, the story goes, onlookers at one of the first sheepdog trials, held in Wales in 1873 were amazed by the breed’s ability to follow hand signals and whistles to gather sheep into pens.</p> <p>Keep in mind that border collies need a lot of dedicated time, attention, and activities. It’s worth the effort, though; collies are one of the most loyal dog breeds out there. Jackson recommends focusing on potty training, commands like “sit” and “stay,” and socialising to help your pup get used to new people, animals, and situations.</p> <h2>German shepherd</h2> <p>Guide dogs for the blind, service dogs, watchdogs, and herding dogs all have one thing in common: they’re often German shepherds. These are some of the easiest dogs to train for work and family life, says animal behaviourist, Dr Mary Burch. No wonder they’re one of the most popular breeds. Because they have a strong protective instinct, it’s important to train them early, so they don’t perceive a threat where there isn’t one.</p> <p>“Pet parents should work to train their dog in short bursts of time – about five to ten minutes – a few times a day,” Jackson says. “Marathon sessions aren’t good for puppies, as their attention spans are too short. Plus, puppies’ growing bodies need lots of rest and sleep, so give them regular breaks. Training before mealtimes and offering treats can be productive, too, as food is a big motivator.” Some researchers say male and female dogs differ when it comes to training, with males being harder dogs to train.</p> <h2>Papillon</h2> <p>With its small stature and lightweight body, this breed is also called the Continental Toy Spaniel. These pups are as well known for their perky, fringed, butterfly-shaped ears (‘papillon’ is French for ‘butterfly’) as they are their personality. Papillons are “intelligent, self-assured, playful, affectionate, and happy,” says Burch. They’re also excellent at learning tricks and obedience work, making them one of the best dogs for first-time owners. While these tiny pups may seem fragile, they’re go-getters that love to exercise and play. You can train papillon puppies to do almost anything, and these lively, popular pets thrive on mental stimulation and work. Try training them to do fun tricks or participate in dog sports, such as agility courses with hurdles to jump and poles to weave through.</p> <h2>Labrador</h2> <p>The ever-popular Labrador retrievers are eager-to-please and some of the easiest dogs to train. Lab pups have personality and then some; they’re friendly, sociable, and playful. Still, you’ll have to stay vigilant with younger doggos. “It’s important to remember that puppies are curious by nature and can easily get into all sorts of mischief, such as swallowing things they shouldn’t,” Jackson says. That kind of behaviour is more than just annoying – it can be life-threatening. You’ll want to train your dogs to “leave it,” or ignore something you don’t want them to pick up.</p> <h2>Golden retriever</h2> <p>Considered sporting dogs, golden retrievers are happy, friendly, and intelligent. Their stellar obedience makes them some of the best-behaved dogs and easiest dogs to train. They also make great service and therapy dogs, Burch says. And they’re one of <a href="https://www.readersdigest.com.au/food-home-garden/pets/15-best-dogs-for-seniors" target="_blank" rel="noopener">the best dogs for seniors</a>. Originally bred to fetch downed waterfowl for hunters, they’ve since evolved into wonderful family dogs. Because they’re loving and want to please, they respond well to verbal praise and playtime.</p> <p>“Positive reinforcement, sometimes known as reward-based training or force-free dog training, is widely recognised as the most effective and humane form of dog training,” says Jackson, who suggests training with snacks or treats, affectionate ear scratches, and belly rubs. “It improves the bond between parent and pet while reinforcing the desired behaviour.”</p> <h2>Border terrier</h2> <p>Happy, affectionate border terriers like to work, which bodes well for obedience training. “They’re good-tempered, affectionate, and easy to train,” Burch says. If your pup takes to training happily, “it’s something to be celebrated,” says Jackson. “This means your training is effective and your puppy is having fun and enjoying pleasing you.”</p> <p>It’s totally fine if your goal is simply to have your pup walk on a leash without pulling or heel off-leash, Jackson adds. Just know that any type of training will take effort on your part. “A lot of progress in training depends on the time a pet parent puts into working with their pup, which is why many pet parents are reminded that getting a puppy is hard work,” he says. “In the end, it’s always worth it – for both parties involved.”</p> <h2>Poodle </h2> <p>A sweet, lively breed that comes in a variety of sizes, the poodle is the national dog of France. But get this: they’re not actually French dogs, they were originally bred in Germany as waterfowl-hunting dogs; the name poodle comes from the German word ‘pudel,’ which means ‘to splash in the water.’</p> <p>Curly hair might make poodles the most stylish pups outside the Westminster Dog Show, but they’re also some of the smartest, part of the reason they’re among the easiest dogs to train. With a high level of intelligence, athletic nature, and innate desire to be a companion, the poodle is a very fast learner that loves the challenge of not only training but also learning new tricks and games. They need frequent mental and physical stimulation, though, so give your poodle plenty of toys and games, such as puzzle feeding bowls.</p> <h2>Doberman pinscher</h2> <p>The statuesque Doberman pinscher is renowned for being one of the easiest dogs to train, which is why they’re frequently used for military and police work. Despite reputations as protective and fearsome guard dogs, these German dogs were actually bred as companion animals, making them great pets for families (yes, even kids). They’re known for being loyal, brave, trustworthy, and intelligent, and while they need plenty of enrichment and exercise, they’re also happy with a cuddle on the couch.</p> <p>Due to their large size, consistent training from a young age is key, ensuring they learn how to sit, stay, and walk nicely on a leash without pulling. “The key tool for keeping your dog calm is teaching them to have great owner focus,” explains Briggs. “Owner focus does not mean forcing the dog to pay attention to us humans. It means rewarding the dog for checking in with us, no matter the situation.”</p> <h2>Corgi</h2> <p>Both the Pembroke Welsh corgi and Cardigan Welsh corgi make for obedient, loving pets. Even Queen Elizabeth II was a fan of corgis, having owned at least 30 throughout her lifetime. You don’t need to live in a palace to enjoy a corgi, though. They’re also one of the <a href="https://www.readersdigest.com.au/pets/13-best-apartment-dogs" target="_blank" rel="noopener">best apartment dogs</a> – they’re perfectly pint-size and love looking out the window and watching the world.</p> <p>The breed is intelligent and quick-witted, with an innate nature to herd and work. As such, they’re receptive to training. Combine that with their fearless nature, and it’s no surprise corgis are always interested in trying new things or learning games. Although they can be strong-willed, regular training and exposure to plenty of new environments and settings will help your pup become obedient, well-adjusted, and good with kids. Just be sure you’re able to give your corgi plenty of exercise.</p> <div> </div> <h2>Shetland sheepdog</h2> <p>The iconic Shetland sheepdog, or sheltie, is a beautiful animal and one of the most popular medium dog breeds. It’s a herding breed originally from Scotland’s Shetland Islands, and with a love for people, it makes a wonderful family dog. When it comes to training, the sheltie enjoys a challenge and also loves to please, landing it on the list of most-trainable dogs. Its intelligent nature and knack for agility and athletics make it a prime candidate for agility courses and doggy tricks. Indeed, many sheltie owners go above and beyond basic obedience training.</p> <p>These dogs are energetic and eager, so they’ll do best with a big yard or plenty of long walks. They’re also kind, playful, and loving, remaining loyal throughout life. They’re known for being very sensitive, so teach your puppy the foundations by being gentle and giving lots of positive reinforcement. They may be one of the easiest dogs to train, but the key to success is calmness. “The most important factor in maintaining calm in your dog is for you to remain calm,” says Briggs. “Emotions run down the leash, so whatever you’re feeling can be sensed by your dog.”</p> <h2>Mixed-breed dog</h2> <p>When you’re looking for the easiest dogs to own, don’t rule out a shelter dog. Plenty of perfectly well-behaved pups still wind up in shelters. And for those who need a few lessons in manners, many shelters have training programs to get dogs ready for adoption. You may find a lovable purebred or mixed-breed dog who’s eager to please and ready to make a loving, obedient addition to your family.</p> <p><em><span style="color: #444444; font-family: Raleway, sans-serif, 'Helvetica Neue', Helvetica, Arial; font-size: 16px; background-color: #ffffff;">Image credit: Shutterstock</span></em></p> <p><em><span style="color: #444444; font-family: Raleway, sans-serif, 'Helvetica Neue', Helvetica, Arial; font-size: 16px; background-color: #ffffff;">This article originally appeared on <a href="https://www.readersdigest.com.au/food-home-garden/pets/11-easiest-dogs-to-train-that-make-obedient-pets?pages=2" target="_blank" rel="noopener">Reader's Digest</a>. </span></em></p>

Family & Pets

Placeholder Content Image

The easiest way to witness one of nature’s most incredible natural displays

<p>With travel back on the cards for the first time in over two years, many Aussies are jumping at the chance to tick the world’s most breathtaking destinations off their bucket lists.</p> <p>For many, this includes seeing the famous Northern Lights. However, Australians can spend a small fortune to venture to the Arctic to experience these dramatic light transformations, and that’s assuming you’re lucky enough to not have bad weather or light pollution obstruct the natural show.</p> <p>But now, there is a revolutionary way for Aussies to experience the Southern Hemisphere’s equivalent, the Aurora Australis, without having to travel too far from home, thanks to the Southern Lights scenic flights with Chimu Adventures. The incredible Aurora Australis, or Southern Lights, dance across the sky in amazing colours and formations, one of nature’s most unique scenes, but are best visible from the air, away from light pollution. </p> <p>The Southern Lights occur naturally in the earth’s sky around the magnetic north and south poles, producing an ethereal and dynamic exhibition of colours that are most visible in high latitude areas. </p> <p>When we observe this electrical phenomenon, we are witnessing billions of individual collisions of energy lighting up the magnetic lines of our planet.</p> <p>The Aurora Australis has received much less attention than the Aurora Borealis, or the Northern Lights, due to its accessibility.</p> <p>While the Northern Lights are most visible from Scandinavian countries such as Norway, Sweden and Iceland, the Southern Lights shine brightest in one of the world’s most remote regions: the Antarctic Circle.</p> <p>While Aurora enthusiasts have been capturing rare glimpses of the Aurora Australis from Australia and New Zealand at a distance, they have been at a disadvantage due to their inaccessibility.</p> <p>But how much could we learn, and how much more could we see if we could get closer?</p> <p>Australians can now experience the Aurora Australis like never before with<a href="https://www.chimuadventures.com/blog/2021/03/southern-lights-aurora-australis-guide/"> Chimu Adventures</a>, with lucky travellers getting a front row seat to the Southern Lights.</p> <p>After boarding a private Qantas 787-9 Dreamliner with a team of expert astronomers, you will head over the Southern Ocean towards Antarctica.</p> <p>Leaving mid-evening to avoid light pollution and unpredictable weather systems, you will travel above the clouds to chase the Southern Aurora Zone.</p> <p>With flights leaving from Sydney, Melbourne, Perth and Brisbane, you will witness the beauty of stars, constellations and planets unlike you’ve ever seen before.</p> <p>With Chimu Adventures being the only company to offer this extraordinary experience, the 12-14 hour flights are truly a one-of-a-kind travel adventure.</p> <p>Passengers will enjoy Qantas inflight services in both business and economy classes, as astronomers will provide expert information during the flight about how an Aurora is created.</p> <p>During the flight, travellers will witness the majestic curtains of light dancing across the sky, as the kaleidoscope of colours ignite the senses like never before.</p> <p>The colours of the Aurora differ depending on your altitude, with green the most common colour we see in both the Southern and Northern lights.</p> <p>The green in an aurora is caused by ions colliding with oxygen at lower altitudes, where reds are the result of collisions occurring at much higher altitudes, making them less common to see.</p> <p>Blue and purple lights also make an appearance in the Auroras, however our eyes are largely incapable of picking these up.</p> <p>What can help capture the wide range of colours in the natural Aurora shows is the invaluable lens of a camera.</p> <p>A modern, sophisticated camera is far more sensitive than the human eye and better at capturing the complexities of colours on display within an Aurora.</p> <p>The astrophotographers onboard will offer valuable commentary on how to photograph the Aurora, as well as capturing a series of images for your personal collection, allowing you to watch the natural light show first-hand rather than through a lens.</p> <p>With different booking classes and a seat swapping structure in place to share the best view of this amazing natural display from the large Dreamliner windows, there is an option for everyone to experience the Southern Lights in all their natural glory.</p> <p>To experience the Aurora Australis natural light show in stunning luxury, with a front-row view of the wonder of the Southern Lights, you can book your seat <a href="https://www.chimuadventures.com/en-au/antarctica/greatsouthernflights">here</a>.</p> <p>With Chimu Adventures offering rare and uninterrupted views of the Aurora Australis with the invaluable guidance of astronomy and astrophotography experts, an unforgettable trip to the Southern Lights should be on everyone’s travel bucket list.</p> <p><em>Image credits: Supplied</em></p> <p><em>This is a sponsored article produced in partnership with <a href="https://www.chimuadventures.com" target="_blank" rel="noopener">Chimu Adventures</a>.</em></p>

International Travel

Placeholder Content Image

The 10 easiest ways to get rid of pet odours

<div class="slide-image" style="box-sizing: border-box; border: 0px; font-family: Raleway, sans-serif, Arial; font-size: 16px; font-style: normal; font-weight: 400; margin: 0px; outline: 0px; padding: 0px; vertical-align: baseline; color: #444444; font-variant-ligatures: normal; font-variant-caps: normal; letter-spacing: normal; orphans: 2; text-align: start; text-indent: 0px; text-transform: none; white-space: normal; widows: 2; word-spacing: 0px; -webkit-text-stroke-width: 0px; text-decoration-thickness: initial; text-decoration-style: initial; text-decoration-color: initial;"> </div> <h4>How do I get rid of pet odours in my house?</h4> <p>As much as we love our four-legged friends, if you’re a pet owner, you are likely no stranger to the smells that come with having a furry roommate. It may be dander, vomit, urine or faeces, but regardless of where the smell originates, you definitely don’t want any sort of smells lingering in your home. Whether it’s dog odour or cat wee, we have a few tips about the art of pet odour removal.</p> <p><strong>How to clean cat vomit</strong></p> <p>It’s not pleasant, but it’s a good thing if you discover cat puke right away. Dry puke can be cleaned too, but since any cat vomit has a tendency to stain, the faster you act, the better. Remove as much vomit as you can with a dry paper towel, spoon or knife, being careful not to press the vomit further into the carpet. Spray the area with water and blot using a dry paper towel. Rotate the towel so you’re always using a dry spot – you will need to use a few to get the job done. Spray an enzyme-based cleaner on the spot to break down the proteins that cause permanent damage, always following the product’s instructions.</p> <p><strong>How to clean dry dog wee</strong></p> <p>Wondering how to get rid of that dog wee smell is an age-old question. A wet vac is an inexpensive and essential tool that will come in handy for many pet removal odours. For dried dog wee, Michelle Schenker, founder of CanineJournal.com, says to saturate the stain with a wet vac and suck up the dirty water. Next, apply a pet odour neutraliser and follow the instructions on the bottle. If your efforts don’t do the trick, try an advanced stain remover. But whatever you do, don’t use vinegar or ammonia for pet odour removal. While vinegar boosts natural cleaning abilities, the Humane Society says using vinegar and ammonia may entice your pet to mark the area.</p> <p><strong>How to clean wet dog wee</strong></p> <p>According to Schenker, wet and dry dog wee are two different beasts that require two different removal techniques. (This method works for cat wee too, and is Humane Society-approved!) Place paper towels over the urine to soak it up, then cover the paper towels with a clean towel. If it’s a rug, place a towel under the urine spot too. Press firmly into the spot with an old rag or something you don’t mind getting urine on to absorb as much liquid as possible. If the paper towels and towels are soaked, repeat the process. Once the urine has been soaked up, rinse with cool water and soak up the area again with towels or a wet vac. When the spot is dry, vacuum. Sprinkle on bi-carb soda and let it sit for 15 to 20 minutes for added freshness, then vacuum again.</p> <p><strong>How to remove the smell of cat wee</strong></p> <p>Dry cat wee is super stinky because it’s concentrated. “Cats are very good at conserving water, so they don’t always drink a lot, and they often eat dry food, so they don’t get a lot of moisture through the food,” says vet Mariah Covey. Male cats that aren’t neutered also have strong smelling urine, Dr Covey says. To remove the smell, try an enzymatic solution, and follow the instructions on the bottle. For older spots, you may want to hire a professional carpet cleaner for this stubborn pet odour removal. “Urine is acidic, but it becomes alkaline and ammonium salts form in the residue it creates,” says Jeremy Strickland, general manager of Randy’s Carpet Care. “Urine spots are like icebergs – what you see on the surface may only be minor, but the urine probably saturated the padding and possibly the subfloor.” Therefore, the longer it sits, the stinkier it gets.</p> <p><strong>How to remove the smell of a kitty litter box</strong></p> <p>Whether you have a regular or self-cleaning litter box, the easiest solution is to scoop the poop and wee immediately, but unless you plan on standing guard over the litter box, that’s not likely to happen. To help minimise odours, sprinkle bi-carb soda over the litter instead of buying scented litter, as highly scented litter can be off-putting to cats, according to the Humane Society. Cats generally prefer a fine-grain litter, as it feels softer on their paws. Once a month, toss the litter and wipe down the litter box with an enzyme pet odour eliminator. Refrain from using bleach, as cats are highly sensitive to the strong odour and may refuse to use the litter box. Keep things smelling fresh continuously with an air purifier.</p> <p><strong>How to clean the pet bed</strong></p> <p>Unless you have a non-shedding pet, fur is probably covering most of the dog bed, and that’s one of the culprits for the stink. When your cat or dog perspires, the scent is emitted through their fur, so it’s essential to vacuum it up before laundering. (Animal hair sticks to wet clothing and the inside of your washing machine.) The Humane Society recommends adding half a kilo of bi-carb soda to your regular detergent for pet odour removal. Air dry if possible to avoid shrinkage. If the bed still smells, wash it again with an enzymatic cleaner to break down pet-waste odours.</p> <p><strong>How to get dog smell out of the sofa</strong></p> <p>Those snuggle times on the sofa with your fur baby are the highlight of your day, but every so often that funky smell is too strong to dismiss. Like with pet bed clean-up, you’ll need to vacuum the furniture first. Next, sprinkle the area with bi-carb soda. Let it sit for 20 to 30 minutes, then vacuum again.</p> <p><strong>How to get the smell out of the travel crate</strong></p> <p>Whether it’s mesh or plastic, your pet’s crate can develop a pungent odour. Sometimes the culprit is a dirty liner that needs a scrub down, but it could also stem from a nervous car ride to the vet. Even if your dog or cat doesn’t puke, when they’re nervous, they can release the contents from their anal sacs. Panting and sweating also contribute to odour built up in a small space like a carrier. To clean, toss any liners and blankets in the wash. Wipe down plastic carriers with an enzyme cleaner. Place soft carriers in the bathtub with warm water and the recommended amount of enzyme all-purpose cleaner, then air dry.</p> <p><strong>How to use home-made cleaning spray</strong></p> <p>This recipe for pet cleaner is easy to make with ingredients you probably have in your cupboard. Dissolve 1 tablespoon of salt in 2 cups of warm water. Add 1/2 cup of white vinegar, 1 tablespoon of detergent, and 2 tablespoons of rubbing alcohol, then mix well and funnel into a spray bottle.</p> <p>Always remove as much of the stain as possible first, then spray with water and blot with a dry paper towel. Next, saturate the stain with the cleaner. Sprinkle with bi-carb soda, and vacuum when the spot is dry. Since this formula has vinegar in it, it is a pet-odour removal more suited for messes not containing urine.</p> <p><strong>How to remove the pet smell from the air</strong></p> <p>So you’ve cleaned all the pet odours and used all the pet odour eliminators, but there’s still a hint of eau de pooch? What’s left in the pet odour removal arsenal? Try an ozone generator to neutralise the odours. “An air purifier uses fans to pull air into it and runs it through a filter to ‘scrub’ it before sending it back out,” Strickland says. “But an ozone generator uses an internal fan to push air out. The air coming out of it contains an extra oxygen molecule, creating O3, or ozone, which neutralises the air on soft surfaces.”</p> <p>This takes care of the surfaces you can’t easily clean, like blinds, curtains and upholstery. And, unlike with an air purifier, you only have to run it for a few hours, intermittently.</p> <p>This article originally appeared on <a href="https://www.readersdigest.com.au/food-home-garden/pets/the-10-easiest-ways-to-get-rid-of-pet-odours" target="_blank" rel="noopener">Reader's Digest</a>. </p> <p><em>Image: Getty</em></p> <p> </p>

Family & Pets

Placeholder Content Image

The 10 easiest ways to get rid of pet odours

<p>As much as we love our four-legged friends, if you’re a pet owner, you are likely no stranger to the smells that come with having a furry roommate. It may be dander, vomit, urine or faeces, but regardless of where the smell originates, you definitely don’t want any sort of smells lingering in your home.</p> <p>Whether it’s dog odour or cat wee, we have a few tips about the art of pet odour removal.</p> <p><strong>How to clean cat vomit</strong></p> <p>It’s not pleasant, but it’s a good thing if you discover cat puke right away. Dry puke can be cleaned too, but since any cat vomit has a tendency to stain, the faster you act, the better. Remove as much vomit as you can with a dry paper towel, spoon or knife, being careful not to press the vomit further into the carpet. Spray the area with water and blot using a dry paper towel.</p> <p>Rotate the towel so you’re always using a dry spot – you will need to use a few to get the job done. Spray an enzyme-based cleaner on the spot to break down the proteins that cause permanent damage, always following the product’s instructions.</p> <p><strong>How to clean dried dog wee</strong></p> <p>Wondering how to get rid of that dog wee smell is an age-old question. A wet vac is an inexpensive and essential tool that will come in handy for many pet removal odours. For dried dog wee, Michelle Schenker, founder of CanineJournal.com, says to saturate the stain with a wet vac and suck up the dirty water. Next, apply a pet odour neutraliser and follow the instructions on the bottle. </p> <p>If your efforts don’t do the trick, try an advanced stain remover. But whatever you do, don’t use vinegar or ammonia for pet odour removal. While vinegar boosts natural cleaning abilities, the Humane Society says using vinegar and ammonia may entice your pet to mark the area.</p> <p><strong>How to clean wet dog wee</strong></p> <p>According to Schenker, wet and dry dog wee are two different beasts that require two different removal techniques. (This method works for cat wee too, and is Humane Society-approved!) Place paper towels over the urine to soak it up, then cover the paper towels with a clean towel. If it’s a rug, place a towel under the urine spot too. Press firmly into the spot with an old rag or something you don’t mind getting urine on to absorb as much liquid as possible.</p> <p>If the paper towels and towels are soaked, repeat the process. Once the urine has been soaked up, rinse with cool water and soak up the area again with towels or a wet vac. When the spot is dry, vacuum. Sprinkle on bi-carb soda and let it sit for 15 to 20 minutes for added freshness, then vacuum again.</p> <p><strong>How to remove the smell of cat wee</strong></p> <p>Dry cat wee is super stinky because it’s concentrated. “Cats are very good at conserving water, so they don’t always drink a lot, and they often eat dry food, so they don’t get a lot of moisture through the food,” says vet Mariah Covey. Male cats that aren’t neutered also have strong smelling urine, Dr Covey says. To remove the smell, try an enzymatic solution, and follow the instructions on the bottle. For older spots, you may want to hire a professional carpet cleaner for this stubborn pet odour removal.</p> <p>“Urine is acidic, but it becomes alkaline and ammonium salts form in the residue it creates,” says Jeremy Strickland, general manager of Randy’s Carpet Care. “Urine spots are like icebergs – what you see on the surface may only be minor, but the urine probably saturated the padding and possibly the subfloor.” Therefore, the longer it sits, the stinkier it gets.</p> <p><strong>How to remove the smell of a kitty litter box</strong></p> <p>Whether you have a regular or self-cleaning litter box, the easiest solution is to scoop the poop and wee immediately, but unless you plan on standing guard over the litter box, that’s not likely to happen. To help minimise odours, sprinkle bi-carb soda over the litter instead of buying scented litter, as highly scented litter can be off-putting to cats, according to the Humane Society.</p> <p>Cats generally prefer a fine-grain litter, as it feels softer on their paws. Once a month, toss the litter and wipe down the litter box with an enzyme pet odour eliminator. Refrain from using bleach, as cats are highly sensitive to the strong odour and may refuse to use the litter box. Keep things smelling fresh continuously with an air purifier.</p> <p><strong>How to clean the pet bed</strong></p> <p>Unless you have a non-shedding pet, fur is probably covering most of the dog bed, and that’s one of the culprits for the stink. When your cat or dog perspires, the scent is emitted through their fur, so it’s essential to vacuum it up before laundering. (Animal hair sticks to wet clothing and the inside of your washing machine.)</p> <p>The Humane Society recommends adding half a kilo of bi-carb soda to your regular detergent for pet odour removal. Air dry if possible to avoid shrinkage. If the bed still smells, wash it again with an enzymatic cleaner to break down pet-waste odours.</p> <p><strong>How to get the dog smell out of the sofa</strong></p> <p>Those snuggle times on the sofa with your fur baby are the highlight of your day, but every so often that funky smell is too strong to dismiss. Like with pet bed clean-up, you’ll need to vacuum the furniture first. Next, sprinkle the area with bi-carb soda. Let it sit for 20 to 30 minutes, then vacuum again.</p> <p><strong>How to get the smell out of the travel crate</strong></p> <p>Whether it’s mesh or plastic, your pet’s crate can develop a pungent odour. Sometimes the culprit is a dirty liner that needs a scrub down, but it could also stem from a nervous car ride to the vet. Even if your dog or cat doesn’t puke, when they’re nervous, they can release the contents from their anal sacs. Panting and sweating also contribute to odour built up in a small space like a carrier.</p> <p>To clean, toss any liners and blankets in the wash. Wipe down plastic carriers with an enzyme cleaner. Place soft carriers in the bathtub with warm water and the recommended amount of enzyme all-purpose cleaner, then air dry.</p> <p><strong>How to use homemade cleaning spray</strong></p> <p>This recipe for pet cleaner is easy to make with ingredients you probably have in your cupboard. Dissolve 1 tablespoon of salt in 2 cups of warm water. Add 1/2 cup of white vinegar, 1 tablespoon of detergent, and 2 tablespoons of rubbing alcohol, then mix well and funnel into a spray bottle.</p> <p>Always remove as much of the stain as possible first, then spray with water and blot with a dry paper towel. Next, saturate the stain with the cleaner. Sprinkle with bi-carb soda, and vacuum when the spot is dry. Since this formula has vinegar in it, it is a pet-odour removal more suited for messes not containing urine.</p> <p><strong>How to remove the pet smell in the air</strong></p> <p>So you’ve cleaned all the pet odours and used all the pet odour eliminators, but there’s still a hint of eau de pooch? What’s left in the pet odour removal arsenal? Try an ozone generator to neutralise the odours. “An air purifier uses fans to pull air into it and runs it through a filter to ‘scrub’ it before sending it back out,” Strickland says. “But an ozone generator uses an internal fan to push air out. The air coming out of it contains an extra oxygen molecule, creating O3, or ozone, which neutralises the air on soft surfaces.”</p> <p>This takes care of the surfaces you can’t easily clean, like blinds, curtains and upholstery. And, unlike with an air purifier, you only have to run it for a few hours, intermittently.</p> <p><em>Image credits: Getty Images</em></p> <p><em>This article originally appeared on <a href="https://www.readersdigest.com.au/food-home-garden/pets/the-10-easiest-ways-to-get-rid-of-pet-odours?pages=1" target="_blank" rel="noopener">Reader's Digest</a>. </em></p>

Home & Garden

Placeholder Content Image

The easiest foods to grow at home during quarantine

<p><strong>First, don't panic. There's no shortage of food</strong></p> <p>As alarming as it has been to see bare shelves in the supermarket, food producers and reports confirm there's plenty of food to go around. Unfortunately, news of the coronavirus has scared us into panic-buying and hoarding. Sometimes we can't find the basic foods we want, such as pantry staples like flour and rice. Then again, some of us are avoiding going into the stores at all, unsure how to protect ourselves from this invisible enemy. All this has led to a bump in buying seeds and plants and searching for gardening tips online, so we can grow our own foods at home. The good news is that many fruits and veggies are easy to grow, even for beginners, and they'll thrive whether you're gardening in a backyard plot or in containers on your patio, porch or apartment balcony.</p> <p><strong>Grow beans in a snap</strong></p> <p>You might be surprised to know you don’t need a big garden to grow green beans. Bush beans are space-savers, but you can also grow beans vertically, by choosing pole varieties and training their vines onto a trellis, fence, or other support. Full sun, regular waterings and moderately rich soil will pay off in a plentiful harvest, and beans don’t need much fertiliser, although they’ll benefit from a side-dressing of compost in mid-season if you didn’t work a lot of compost into the soil before you planted. Check your seed packet to know approximately when your variety will be ready to harvest, and keep the plants picked so they’ll keep producing. Freeze your green beans to enjoy them all year long.</p> <p><a rel="noopener" href="https://www.readersdigest.com.au/gardening-how-to-grow/how-to-grow-runner-beans" target="_blank">Find out more about how to grow runner beans. </a></p> <p><strong>Raise crunchy radishes</strong></p> <p>Many gardeners love fresh radishes for that crunch that you get when you bite into them – but these simple root veggies are good for more than eating. Because the seeds sprout quickly – often within a week – you can use them in the garden to mark the rows of other crops that don’t come up as fast. Simply sow the seeds outdoors about 1-2cm deep as the temperature cools. Wait ten days and plant again for a continuous crop. They’ll thrive in a sunny spot that has loose soil amended with organic matter. Thin the seedlings to 5cm apart, so their roots won’t be crowded, and keep the plants evenly moist. Some varieties are ready to harvest just three weeks after planting.</p> <p><strong>Cultivate cucumbers</strong></p> <p>Like zucchini, cucumbers are prolific and easy to grow. Just give them a spot with moist, fertile soil and lots of sunshine. Start the seeds a couple of centimetres deep into the ground. They’ll sprout in a few days. Keep them happy with regular waterings and, if you didn’t work a lot of organic matter into the soil before you planted, side-dress them with a balanced, soluble fertiliser when the fruits set. The cucumbers are ready to harvest when they’re still small and the skins are tender. To keep a steady supply for the table, make successive plantings. If you’re short on space, train vining cucumber varieties onto a support like a fence or trellis, or plant a bush variety in a container or raised bed. Use your cukes in salsas, salads, gazpacho and smoothies or turn them into pickles.</p> <p><a rel="noopener" href="https://www.readersdigest.com.au/gardening-how-to-grow/how-to-grow-cucumbers" target="_blank">Learn more about growing cucumbers. </a></p> <div class="at-below-post addthis_tool" data-url="https://www.readersdigest.com.au/food-home-garden/gardening-how-to-grow/the-easiest-foods-to-grow-at-home-during-quarantine"><strong>Crack out some capsicum</strong></div> <p>Capsicums thrive in sunny climes, so make sure they have a warm, sunny spot not prone to wind or frost. They can also be grown in pots. Capsicums like a deep, warm, well draining soil, mulch and room to breathe, so leave about 50–60cm between your capsicums when planting out. Prepare the soil a month before planting by throwing in some fertiliser, then mulch.</p> <p><a rel="noopener" href="https://www.readersdigest.com.au/gardening-how-to-grow/how-to-grow-capsicums-chillies" target="_blank">Discover more about growing capsicums and chillies.</a></p> <p><strong>Plant tasty tomatoes</strong></p> <p>The hardest thing about growing tomatoes might be choosing your favourite kind. There are cherry tomatoes, grape tomatoes, heirlooms with rich flavours, Romas for stews, pasta and sauces, and hearty beefsteaks. Gardeners in cool regions may want to start with transplants to save time over growing tomatoes from seeds. The plants need full sun and soil that drains easily. For best results, your soil should contain lots of compost and be slightly acidic, with a pH of 6.2 to 6.8. As the plants grow, apply a fertiliser recommended for tomatoes as directed on the label. This raised garden bed with an automatic watering system makes it easy to grow compact or patio-type tomatoes, even in a small space.</p> <p><a rel="noopener" href="https://www.readersdigest.com.au/gardening-how-to-grow/how-to-grow-tomatoes" target="_blank">Here’s more great advice on growing tomatoes. </a></p> <p><strong>Sow lettuce for salads</strong></p> <div id="page8" class="slide-show"> <div id="test" class="slide listicle-slide"> <div class="slide-description"> <p>Lettuces are great for beginning gardeners. They grow fast, take full sun but tolerate some shade, and can be tucked between other fruits and veggies or into containers. They’re also available in lots of tasty, colourful varieties. If you don’t have an ideal garden spot – for example, your soil contains a lot of clay or rocks – use a raised bed instead. Add good quality planting soil, you won’t have to dig. The loose soil will also make it easy to pluck any weeds that pop up. Sow your lettuce seeds in early autumn or spring and keep the plants watered regularly. Lettuce started in spring will last until the summer heat arrives and autumn-sown lettuce will grow until a killing frost. Harvest the outermost leaves first but don’t pull up the plants, so they can keep producing.</p> <p><a rel="noopener" href="https://www.readersdigest.com.au/gardeing-tips/7-fertilizers-for-your-garden" target="_blank">Discover 7 surprising fertilisers for your garden. </a></p> <div class="at-below-post addthis_tool" data-url="https://www.readersdigest.com.au/food-home-garden/gardening-how-to-grow/the-easiest-foods-to-grow-at-home-during-quarantine"><strong>Set out onions</strong></div> </div> </div> </div> <div id="page9" class="slide-show"> <div id="test" class="slide listicle-slide"> <div class="slide-description"> <p>Make a little hole in the ground, tuck in a bare-root onion seedling, and stand back. In two or three weeks, the small plants will be ready to pull and use as green onions, or you can wait until the bulbs are bigger and then harvest them. Mature onions will let you know they’re ready when their tops turn yellow and bend over. Just brush off the soil and put the onions, with the tops still attached, in a warm, dry, well-ventilated place to cure for a week to 10 days. Then remove the top foliage and roots and store the onions in a cool, airy place until you’re ready to use them. Slice and fry them for onion rings, chop them for salsas and salads, or grill, roast or pickle them. Chopped or sliced onions can be refrigerated in sealed containers for seven to 10 days.</p> <div class="at-below-post addthis_tool" data-url="https://www.readersdigest.com.au/food-home-garden/gardening-how-to-grow/the-easiest-foods-to-grow-at-home-during-quarantine"><strong>Fill a windowsill with herbs</strong></div> </div> </div> </div> <div class="tg-container categorySection detailSection"> <div id="primary" class="contentAreaLeft"> <div id="page10" class="slide-show"> <div id="test" class="slide listicle-slide"> <div class="slide-description"> <p>During a quarantine, a herb garden makes a thoughtful gift for a housebound friend or a fun and easy growing project you can enjoy without leaving home. Although the types of herbs you’ll want to include may vary, good choices include basil to make into pesto, mint to steep for tea or dill to add flavour to homemade pickles. So many herbs are easy to grow, you may not want to stop.</p> <p><strong>Plant prolific zucchinis</strong></p> </div> </div> </div> </div> </div> <div class="slide-description"> <p>Zucchinis have a reputation for being so easy to grow, and so prolific, gardeners joke about having to leave their extras on a neighbour’s doorstep, ring the bell, and run away. Just one plant can yield 2.5-4.5kg of zucchinis in a single growing season. Plant their seeds directly in your garden or a large container. They need full sun and moist, easily-draining soil amended with compost. Give them a couple of centimetres of water each week, if there’s no rain, and harvest when the fruits are small (botanically speaking, zucchinis are fruits) and the skins are tender. You can freeze zucchinis or bake them into breads, slice them into strips for pasta, grate them for fritters or chop them into vegetable chillis. They’re also delicious when you know how to roast vegetables until they’re crispy and caramelised.</p> <p><strong>Grow a bagful of potatoes</strong></p> <div id="page1" class="slide-show"> <div id="test" class="slide listicle-slide"> <div class="slide-description"> <p>Humble, nutritious potatoes are a great choice for beginning gardeners, especially when you use good potting soil and compost. Start with seed potatoes that haven’t been treated to resist sprouting. Cut them into chunks with two eyes per chunk and let them dry overnight before planting them. Then give them full sun and regular water. Add more soil to the bag when the plants are about 8 inches tall, leaving the top set of leaves uncovered. Add more soil when the plants grow another 8 inches tall and repeat this process until the bag is full. When the foliage turns yellow, stop watering and wait about a week before you dig up the potatoes with your gloved hands. Many grow bags are reusable and available in different sizes.</p> <p><a rel="noopener" href="https://www.readersdigest.com.au/gardeningtips/16-ways-to-kill-garden-weeds" target="_blank">Here are 16 ways to kill garden weeds. </a></p> <div class="at-below-post addthis_tool" data-url="https://www.readersdigest.com.au/food-home-garden/gardening-how-to-grow/the-easiest-foods-to-grow-at-home-during-quarantine"><strong>Plant a bushel of peas</strong></div> </div> </div> </div> <div id="page2" class="slide-show"> <div id="test" class="slide listicle-slide"> <div class="slide-description"> <p>There are lots of delightful types of peas. Choose disease-resistant varieties, and you won’t need to do much more than plant them, water regularly and harvest them. Sow the peas in wide rows, covering them with an inch of soil and planting 5cm deep. Peas grow well during the cooler months but the flowers can be damaged by frost so, in very cold areas, wait until spring to sow. They don’t usually need fertiliser, but they do need a deep, weekly watering if rain is scarce. For best results, grow your peas, including dwarf varieties, on a trellis or other support. Read your seed packet to know when to harvest, and pick often, so the plants will keep producing. Fresh peas have the best taste, but you can freeze or dry them to use later.</p> <p><strong>Grow chillies for fiery flavour</strong></p> </div> </div> </div> <div id="page3" class="slide-show"> <div id="test" class="slide listicle-slide"> <div class="slide-description"> <p>You’ve heard that variety is the spice of life – well, so are jalapenos, habaneros and other spicy chillies. The seeds can be sown from August to December in temperate areas and from September to mid-November only in cold climates. They are also available as seedlings. Sow seeds 6mm deep in punnets, gently pricking out the seedlings and transferring them to 100mm pots, giving them a sunny position. Plant them in the garden in a sheltered spot in full sun when they are 150mm high. The soil should be free-draining and enriched with either compost, aged cow manure or Yates Dynamic Lifter before planting.</p> <p>Use scissors to snip off your chillies when they’re the size you want. Chillies don’t just add heat and flavour to your foods. They also contain capsaicin, which is thought to act as an antioxidant to help fight infection and prevent some types of heart disease.</p> <p><em>Source:<span> </span><a rel="noopener" href="https://www.rd.com/home/gardening/easiest-foods-to-grow-at-home/" target="_blank">RD.com</a></em></p> <div class="at-below-post addthis_tool" data-url="https://www.readersdigest.com.au/food-home-garden/gardening-how-to-grow/the-easiest-foods-to-grow-at-home-during-quarantine"><em>Written by <span>Lynn Coulter</span>. This article first appeared in <a rel="noopener" href="https://www.readersdigest.com.au/food-home-garden/gardening-how-to-grow/the-easiest-foods-to-grow-at-home-during-quarantine" target="_blank">Reader’s Digest</a>.</em></div> </div> </div> </div> </div> <p><img style="width: 100px !important; height: 100px !important;" src="https://oversixtydev.blob.core.windows.net/media/7820640/1.png" alt="" data-udi="umb://media/f30947086c8e47b89cb076eb5bb9b3e2" /></p>

Home & Garden

Placeholder Content Image

This is the easiest way to share photos between devices

<p><em><strong>Lisa Du is director of <span style="text-decoration: underline;"><a href="https://readytechgo.com.au/" target="_blank">ReadyTechGo</a></span>, a service that helps people gain the confidence and skills to embrace modern technology. </strong></em></p> <p>You may have seen the words "Air Drop" on your Apple devices and wondered what it was. Air Drop is one of my favourite functions on Apple iPhone, iPads and Macs. </p> <p>The Air Drop function allows you to share photos, videos, contacts and even websites opened on Safari to nearby Apple users (which can be another one of your devices). <br /> <br /><strong> How does it do this?</strong><br /> <br /> Air Drop uses Bluetooth and WiFi to "talk" to nearby devices, and securely transfer the files wirelessly. </p> <p>To use Air Drop, both devices needs to have iOS 7 or later, or a Macbook or iMac with OS X Yosemite or later. </p> <p><strong>How to turn on airdrop on your devices</strong> </p> <p><span style="text-decoration: underline;">iPhone or iPad</span> <br /> 1. On iPads or iPhone, tap on the<strong> Settings</strong> app, and turn on Bluetooth and Wi-Fi</p> <p>2. Scroll down the <strong>Settings</strong> menu and choose <strong>General </strong></p> <p style="text-align: center;"><img width="500" height="NaN" src="https://gallery.mailchimp.com/e785dd9ba906ed79fad48bd7e/images/5f438d0e-4065-48ba-a36c-366dbaee8f07.jpeg" class="mcnImage" style="max-width: 1242px; line-height: 100%; outline: none; vertical-align: bottom; height: auto !important;"/></p> <p>3. Tap on<strong> Air Drop</strong></p> <p>4. Tap on <strong>Everyone</strong> (Options: <strong>Contacts Only </strong>will allow only people in your contacts to see your device, <strong>Everyone</strong> option will allow all nearby iOS users to see your device)</p> <p> </p> <p><span style="text-decoration: underline;">MacBook or iMac</span></p> <p>1. Click on <strong>Finder</strong></p> <p style="text-align: center;"><img width="500" height="NaN" src="https://gallery.mailchimp.com/e785dd9ba906ed79fad48bd7e/images/4d63b2b3-872e-47cb-9be4-fdc899385033.png" class="mcnImage" style="max-width: 1538px; line-height: 100%; outline: none; vertical-align: bottom; height: auto !important;"/></p> <p>2. Click on <strong>Airdrop</strong><br /> <br /> 3.<strong> Allow me to be discoverable by:</strong> Click on the word Contacts only, and choose <strong>Everyone</strong></p> <p><span style="text-decoration: underline;"> </span></p> <p><strong>Using airdrop to share photos</strong></p> <p>Now that we have turned on Airdrop, let's share a photo.</p> <p><span style="text-decoration: underline;">Share a photo from your iPad or iPhone</span></p> <p>1. Open the photo you want to share</p> <p style="text-align: center;"><img width="500" height="NaN" src="https://gallery.mailchimp.com/e785dd9ba906ed79fad48bd7e/_compresseds/904c4131-b762-4019-9ac9-7534d50bdca6.jpeg" class="mcnImage" style="max-width: 2048px; line-height: 100%; outline: none; vertical-align: bottom; height: auto !important;"/></p> <p>2. Tap on the <strong>Share</strong> icon </p> <p>3. Under Airdrop, nearby devices will appear. Tap on the device that you want to send the photo to</p> <p style="text-align: center;"><img width="500" height="NaN" src="https://gallery.mailchimp.com/e785dd9ba906ed79fad48bd7e/images/6f25ae6b-3ddf-4186-ba15-d23578a95ef6.png" class="mcnImage" style="max-width: 2048px; line-height: 100%; outline: none; vertical-align: bottom; height: auto !important;"/></p> <p>Example, I am sharing this photo with my Macbook Pro.</p> <p>4. Give it a sec, and your photo will be sent across to the other device.</p> <p style="text-align: center;"><img width="500" height="NaN" src="https://gallery.mailchimp.com/e785dd9ba906ed79fad48bd7e/images/cf2c6701-db5b-4329-aad2-7b9193c216a5.jpeg" class="mcnImage" style="max-width: 2048px; line-height: 100%; outline: none; vertical-align: bottom; height: auto !important;"/></p> <p>TIP: When you share a photo from your iPad or iPhone to your iMac or Macbook, the photo will be saved to your Downloads folder. You can move this photo into your Picture folder.</p> <p>Have you ever used Airdrop?</p>

Technology

Placeholder Content Image

The easiest pancake recipe

<p>There’s nothing like warm, fluffy, golden pancakes in the morning, and what better day to make them than Pancake Day! Celebrate with this unbelievably easy and delicious recipe from <a href="http://www.goodhousekeeping.com/food-recipes/a15177/pancakes-recipe-ghk0213/" target="_blank"><strong><span style="text-decoration: underline;">Good Housekeeping</span></strong></a> – you’ll never go back to packet mix again.</p> <p><strong><span style="text-decoration: underline;">Makes:</span></strong> 12 pancakes</p> <p><strong><span style="text-decoration: underline;">Ingredients:</span></strong></p> <ul> <li>1 cup plain flour</li> <li>2 tbsp. sugar</li> <li>2 1/2 tsp. baking powder</li> <li>1/2 tsp. salt</li> <li>1 1/4 cup milk</li> <li>3 tbsp. butter, melted</li> <li>1 large egg</li> </ul> <p><strong><span style="text-decoration: underline;">Method</span>:</strong></p> <ol start="1"> <li>Whisk the flour, sugar, baking powder and salt in a large bowl before adding the milk, butter and egg. Stir until flour is moistened.</li> <li>Place a non-stick pan over a medium heat until drop of water sizzles. Brush the pan lightly with vegetable oil.</li> <li>In batches, scoop the batter (around 1Ž4 cup) and spread until about 9cm in diameter. Cook for two to three minutes or until batter begins to bubble and the edges are dry.</li> <li>Using a wide spatula, turn the pancakes and cook for two minutes more or until golden. Transfer to a plate and cover with foil to keep warm.</li> <li>Repeat using remaining batter, re-oiling the pan if necessary.</li> <li>Serve pancakes with desired topping and enjoy!</li> </ol> <p><em><strong>Have you ordered your copy of the Over60 cookbook, </strong></em><strong>The Way Mum Made It</strong><em><strong>, yet? Featuring 175 delicious tried-and-true recipes from you, the Over60 community, and your favourites that have appeared on the Over60 website, <span style="text-decoration: underline;"><a href="https://shop.abc.net.au/products/way-mum-made-it-pbk" target="_blank">head to the abcshop.com.au to order your copy now</a></span>.</strong></em></p> <p><strong>Related links:</strong></p> <p><a href="/lifestyle/food-wine/2016/10/nutella-pancake-stack/"><span style="text-decoration: underline;"><em><strong>Nutella pancake stack</strong></em></span></a></p> <p><a href="/lifestyle/food-wine/2016/07/lamington-pancakes/"><span style="text-decoration: underline;"><em><strong>Lamington pancakes</strong></em></span></a></p> <p><a href="/lifestyle/food-wine/2016/05/pancakes-fresh-berries-yoghurt-honey/"><span style="text-decoration: underline;"><em><strong>Pancakes with fresh berries, yoghurt and honey</strong></em></span></a></p>

News

Placeholder Content Image

The quickest and easiest way to ripen avocados

<p>There’s no doubt about it, we are a nation of avocado lovers. How often do you pop to the supermarket only to find that delicious green fruit is gone, or simply nowhere near being ripe enough?</p> <p>Thankfully, we’ve got a smart and easy trick to ripen them in no time at all, and chances are, you have all the tools you need lying in your kitchen.</p> <p><strong><a href="http://www.goodhousekeeping.com/food-recipes/cooking/a40902/fastest-way-to-ripen-an-avocado/" target="_blank"><span style="text-decoration: underline;">According to Susan Westmoreland</span></a></strong>, food director at the Good Housekeeping Institute, all you need is an unripe avocado, a brown paper bag and another piece of fruit (preferably unripe also – a banana or apple will work fine).</p> <p>Simply place the two fruits in the bag, and they will exchange ethylene gases, causing both to ripen. Leave them in the bag for half a day or so, and both will be ready for your delicious culinary creations.</p> <p>Tell us in the comments below, have you tried this method before? What’s your trick for ripening avocados?</p> <p><strong>Related links:</strong></p> <p><a href="/news/news/2016/08/new-device-stops-avocados-browning/"><strong><span style="text-decoration: underline;"><em>Exciting new invention stops avocados from browning</em></span></strong></a></p> <p><a href="/news/news/2016/06/keep-avocadoes-fresh-for-6-months/"><span style="text-decoration: underline;"><em><strong>The easy trick to keep avocados fresh for 6 months</strong></em></span></a></p> <p><a href="/news/news/2015/10/healthiest-part-of-an-avocado/"><strong><em><span style="text-decoration: underline;">We’ve been binning the healthiest part of avocados</span></em></strong></a></p>

News

Placeholder Content Image

The easiest way to clean your mattress

<p>We change our sheets regularly but what about our poor old mattress? Not only does our mattress do all the hard work, supporting us through a night of slumber, it can also benefit from a deep clean. Mattresses are prime spots for dust build up, largely because we don’t think to clean them very often. Cleaning your mattress with the mixture below helps lift away dirt and dust while removing excess moisture and generally refreshing. People with allergies like asthma and hay fever often find that a mattress spring clean does wonders for their airways though everyone can benefit from a bedding refresh. Here’s how to do it.</p> <p><strong><span style="text-decoration: underline;">What you’ll need:</span></strong></p> <ul> <li>500g box baking soda</li> <li>Essential oil(s) of your choice. Lavender, chamomile and ylang ylang are all good choices.</li> <li>Vacuum cleaner (with an upholstery nozzle if you have one)</li> </ul> <p><strong><span style="text-decoration: underline;">How to:</span></strong></p> <ol> <li>Before you start, it’s a good idea to turn and rotate your mattress, especially if you haven’t done so in a while. You should try to do this every six months but many of us forget.</li> <li>Open your box of baking soda and add 10-20 drops of your chosen essential oil or a blend of a couple of different scents. Go for something soothing and calming. You could also add tea tree or eucalyptus for its anti-bacterial properties.</li> <li>Liberally sprinkle the baking soda over your mattress. Don’t be shy! Once you’ve emptied the box, start rubbing the mixture into the mattress. This ensures that it reaches into all the cracks and crevices.</li> <li>After 1-2 hours, start vacuuming up the residue. Use your upholstery nozzle or the brush attachment and work slowly to ensure you hoover up all the soda mixture.</li> </ol> <p>When was the last time you gave your mattress a deep clean? Do you have a go-to cleaning trick? Share with us in the comments below.</p> <p><strong>Related links:</strong></p> <p><a href="/lifestyle/home-garden/2016/09/cheap-and-trendy-recycling-tips/"><strong><em><span style="text-decoration: underline;">7 cheap and trendy recycling tips</span></em></strong></a></p> <p><a href="/lifestyle/home-garden/2016/09/common-laundry-machine-mistakes/"><em><strong><span style="text-decoration: underline;">6 common laundry machine mistakes</span></strong></em></a></p> <p><a href="/lifestyle/home-garden/2016/09/5-ways-to-bring-the-outdoors-in/"><strong><em><span style="text-decoration: underline;">5 ways to bring the outdoors in</span></em></strong></a></p>

Home & Garden

Placeholder Content Image

The easiest way to clean a microwave

<p>It’s a kitchen workhorse that doesn’t often get the attention it deserves. Here’s a quick, easy and chemical free way to clean your way to a spick, span and sparkling microwave.</p> <p><strong><span style="text-decoration: underline;">What you’ll need:</span></strong></p> <ul> <li>Microwave safe bowl</li> <li>Toothpick or wooden skewer</li> <li>Vinegar</li> <li>Water</li> <li>Sponge</li> </ul> <p><strong><span style="text-decoration: underline;">Instructions:</span></strong></p> <ol> <li>Pour equal parts vinegar and water into the bowl (1/2 cup of each is usually sufficient for most microwaves).</li> <li>Drop your toothpick or another small wooden item into the bowl This isn’t essential but it minimizes the chance of an explosion occurring as the wood will allow bubbles to form which stops uneven heat.</li> <li>Pop the bowl in the microwave and switch on for 5-10min.</li> <li>Once the timer is up, leave for another few minutes for the steam to do its work.</li> <li>Remove the bowl from the microwave using a tea towel or oven mitts, as it will be very hot.</li> <li>Take your sponge, dip it into the hot vinegar-water mix and scrub down the surfaces.</li> </ol> <p>How often do you clean your microwave? Share your cleaning tricks with us in the comments below.</p> <p><strong>Related links:</strong></p> <p><a href="/lifestyle/home-garden/2016/08/your-bed-sheets-could-be-making-you-sick/"><span style="text-decoration: underline;"><em><strong>Your bed sheets could be making you sick</strong></em></span></a></p> <p><a href="/lifestyle/home-garden/2016/08/how-to-clean-your-bathroom-like-a-professional/"><strong><em><span style="text-decoration: underline;">How to clean your bathroom like a professional</span></em></strong></a></p> <p><a href="/lifestyle/home-garden/2016/08/ways-to-ripen-your-avocado-in-minutes/"><span style="text-decoration: underline;"><em><strong>5 ways to ripen your avocado in minutes</strong></em></span></a></p>

Home & Garden

Our Partners