Placeholder Content Image

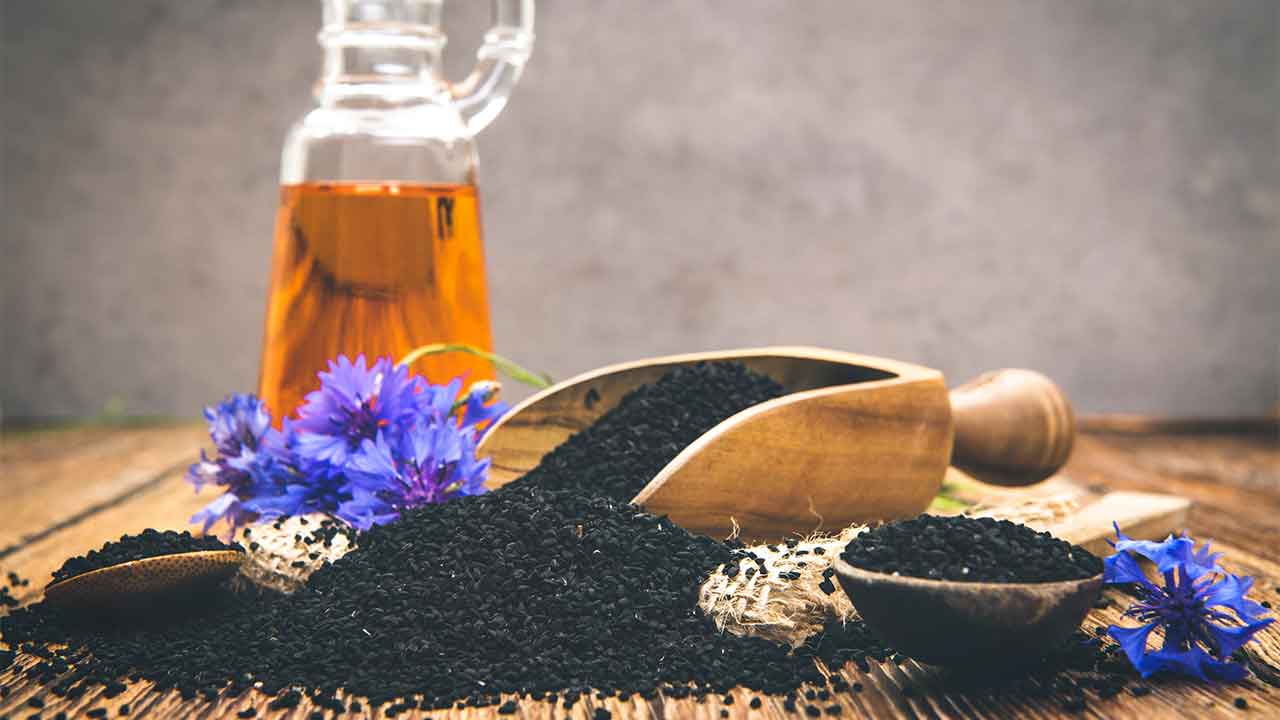
An ancient seed could prove wonders for your hair and skin

<p dir="ltr">In a world of products saturated with new formulas and hero ingredients that promise wondrous benefits, it can feel overwhelming to find a product that works for you.</p> <p dir="ltr">A new contender is the oil of the humble Black Cumin seed, or <em>Nigella sativa</em>, which is the hero ingredient in Hab Shifa’s line of beauty products, including a body wash, moisturiser shampoo and conditioner.</p> <p dir="ltr">With its use dating back to the Ancient Egyptians and in some of the world’s oldest religious and medical texts, <a href="https://www.ncbi.nlm.nih.gov/pmc/articles/PMC2583426/" target="_blank" rel="noopener">clinical studies</a> of the Black Seed have since found it has various health benefits, thanks to its antioxidant, anti-inflammatory, antimicrobial, antiviral, and even anti-diabetic properties.</p> <p><span id="docs-internal-guid-a685ac50-7fff-e15d-7f6e-64f04896e501"></span></p> <p dir="ltr">When it comes to our skin and hair, Black Seed oil has been praised for its ability to cleanse hair of impurities while nurturing the scalp.</p> <blockquote class="instagram-media" style="background: #FFF; border: 0; border-radius: 3px; box-shadow: 0 0 1px 0 rgba(0,0,0,0.5),0 1px 10px 0 rgba(0,0,0,0.15); margin: 1px; max-width: 540px; min-width: 326px; padding: 0; width: calc(100% - 2px);" data-instgrm-permalink="https://www.instagram.com/p/CiOcuLuNVYA/?utm_source=ig_embed&amp;utm_campaign=loading" data-instgrm-version="14"> <div style="padding: 16px;"> <div style="display: flex; flex-direction: row; align-items: center;"> <div style="background-color: #f4f4f4; border-radius: 50%; flex-grow: 0; height: 40px; margin-right: 14px; width: 40px;"> </div> <div style="display: flex; flex-direction: column; flex-grow: 1; justify-content: center;"> <div style="background-color: #f4f4f4; border-radius: 4px; flex-grow: 0; height: 14px; margin-bottom: 6px; width: 100px;"> </div> <div style="background-color: #f4f4f4; border-radius: 4px; flex-grow: 0; height: 14px; width: 60px;"> </div> </div> </div> <div style="padding: 19% 0;"> </div> <div style="display: block; height: 50px; margin: 0 auto 12px; width: 50px;"> </div> <div style="padding-top: 8px;"> <div style="color: #3897f0; font-family: Arial,sans-serif; font-size: 14px; font-style: normal; font-weight: 550; line-height: 18px;">View this post on Instagram</div> </div> <div style="padding: 12.5% 0;"> </div> <div style="display: flex; flex-direction: row; margin-bottom: 14px; align-items: center;"> <div> <div style="background-color: #f4f4f4; border-radius: 50%; height: 12.5px; width: 12.5px; transform: translateX(0px) translateY(7px);"> </div> <div style="background-color: #f4f4f4; height: 12.5px; transform: rotate(-45deg) translateX(3px) translateY(1px); width: 12.5px; flex-grow: 0; margin-right: 14px; margin-left: 2px;"> </div> <div style="background-color: #f4f4f4; border-radius: 50%; height: 12.5px; width: 12.5px; transform: translateX(9px) translateY(-18px);"> </div> </div> <div style="margin-left: 8px;"> <div style="background-color: #f4f4f4; border-radius: 50%; flex-grow: 0; height: 20px; width: 20px;"> </div> <div style="width: 0; height: 0; border-top: 2px solid transparent; border-left: 6px solid #f4f4f4; border-bottom: 2px solid transparent; transform: translateX(16px) translateY(-4px) rotate(30deg);"> </div> </div> <div style="margin-left: auto;"> <div style="width: 0px; border-top: 8px solid #F4F4F4; border-right: 8px solid transparent; transform: translateY(16px);"> </div> <div style="background-color: #f4f4f4; flex-grow: 0; height: 12px; width: 16px; transform: translateY(-4px);"> </div> <div style="width: 0; height: 0; border-top: 8px solid #F4F4F4; border-left: 8px solid transparent; transform: translateY(-4px) translateX(8px);"> </div> </div> </div> <div style="display: flex; flex-direction: column; flex-grow: 1; justify-content: center; margin-bottom: 24px;"> <div style="background-color: #f4f4f4; border-radius: 4px; flex-grow: 0; height: 14px; margin-bottom: 6px; width: 224px;"> </div> <div style="background-color: #f4f4f4; border-radius: 4px; flex-grow: 0; height: 14px; width: 144px;"> </div> </div> <p style="color: #c9c8cd; font-family: Arial,sans-serif; font-size: 14px; line-height: 17px; margin-bottom: 0; margin-top: 8px; overflow: hidden; padding: 8px 0 7px; text-align: center; text-overflow: ellipsis; white-space: nowrap;"><a style="color: #c9c8cd; font-family: Arial,sans-serif; font-size: 14px; font-style: normal; font-weight: normal; line-height: 17px; text-decoration: none;" href="https://www.instagram.com/p/CiOcuLuNVYA/?utm_source=ig_embed&amp;utm_campaign=loading" target="_blank" rel="noopener">A post shared by Hab Shifa Australia (@hab_shifa_black_seed)</a></p> </div> </blockquote> <p dir="ltr">Hab Shifa takes advantage of these qualities and combines Black Seed oil with other anti-irritant ingredients, with the resulting combination helping restore skin elasticity and minimise the loss of moisture in the barriers of the skin.</p> <p dir="ltr">After trialling Hab Shifa’s products over the last few months, I can safely say the shampoo and conditioner make easy work of my hair, leaving it feeling lighter, softer, and clean even when it has been at its greasiest.</p> <p dir="ltr"><span id="docs-internal-guid-7a65138d-7fff-fd3a-4496-5aba5fa2e455"></span></p> <p dir="ltr">The body wash and moisturiser have delivered similar results for my skin, with the scrub helping my skin feel exfoliated while the moisturiser has put an end to my usual bouts of dry skin.</p> <blockquote class="instagram-media" style="background: #FFF; border: 0; border-radius: 3px; box-shadow: 0 0 1px 0 rgba(0,0,0,0.5),0 1px 10px 0 rgba(0,0,0,0.15); margin: 1px; max-width: 540px; min-width: 326px; padding: 0; width: calc(100% - 2px);" data-instgrm-permalink="https://www.instagram.com/p/Ch1t5DOLeXI/?utm_source=ig_embed&amp;utm_campaign=loading" data-instgrm-version="14"> <div style="padding: 16px;"> <div style="display: flex; flex-direction: row; align-items: center;"> <div style="background-color: #f4f4f4; border-radius: 50%; flex-grow: 0; height: 40px; margin-right: 14px; width: 40px;"> </div> <div style="display: flex; flex-direction: column; flex-grow: 1; justify-content: center;"> <div style="background-color: #f4f4f4; border-radius: 4px; flex-grow: 0; height: 14px; margin-bottom: 6px; width: 100px;"> </div> <div style="background-color: #f4f4f4; border-radius: 4px; flex-grow: 0; height: 14px; width: 60px;"> </div> </div> </div> <div style="padding: 19% 0;"> </div> <div style="display: block; height: 50px; margin: 0 auto 12px; width: 50px;"> </div> <div style="padding-top: 8px;"> <div style="color: #3897f0; font-family: Arial,sans-serif; font-size: 14px; font-style: normal; font-weight: 550; line-height: 18px;">View this post on Instagram</div> </div> <div style="padding: 12.5% 0;"> </div> <div style="display: flex; flex-direction: row; margin-bottom: 14px; align-items: center;"> <div> <div style="background-color: #f4f4f4; border-radius: 50%; height: 12.5px; width: 12.5px; transform: translateX(0px) translateY(7px);"> </div> <div style="background-color: #f4f4f4; height: 12.5px; transform: rotate(-45deg) translateX(3px) translateY(1px); width: 12.5px; flex-grow: 0; margin-right: 14px; margin-left: 2px;"> </div> <div style="background-color: #f4f4f4; border-radius: 50%; height: 12.5px; width: 12.5px; transform: translateX(9px) translateY(-18px);"> </div> </div> <div style="margin-left: 8px;"> <div style="background-color: #f4f4f4; border-radius: 50%; flex-grow: 0; height: 20px; width: 20px;"> </div> <div style="width: 0; height: 0; border-top: 2px solid transparent; border-left: 6px solid #f4f4f4; border-bottom: 2px solid transparent; transform: translateX(16px) translateY(-4px) rotate(30deg);"> </div> </div> <div style="margin-left: auto;"> <div style="width: 0px; border-top: 8px solid #F4F4F4; border-right: 8px solid transparent; transform: translateY(16px);"> </div> <div style="background-color: #f4f4f4; flex-grow: 0; height: 12px; width: 16px; transform: translateY(-4px);"> </div> <div style="width: 0; height: 0; border-top: 8px solid #F4F4F4; border-left: 8px solid transparent; transform: translateY(-4px) translateX(8px);"> </div> </div> </div> <div style="display: flex; flex-direction: column; flex-grow: 1; justify-content: center; margin-bottom: 24px;"> <div style="background-color: #f4f4f4; border-radius: 4px; flex-grow: 0; height: 14px; margin-bottom: 6px; width: 224px;"> </div> <div style="background-color: #f4f4f4; border-radius: 4px; flex-grow: 0; height: 14px; width: 144px;"> </div> </div> <p style="color: #c9c8cd; font-family: Arial,sans-serif; font-size: 14px; line-height: 17px; margin-bottom: 0; margin-top: 8px; overflow: hidden; padding: 8px 0 7px; text-align: center; text-overflow: ellipsis; white-space: nowrap;"><a style="color: #c9c8cd; font-family: Arial,sans-serif; font-size: 14px; font-style: normal; font-weight: normal; line-height: 17px; text-decoration: none;" href="https://www.instagram.com/p/Ch1t5DOLeXI/?utm_source=ig_embed&amp;utm_campaign=loading" target="_blank" rel="noopener">A post shared by Hab Shifa Australia (@hab_shifa_black_seed)</a></p> </div> </blockquote> <p dir="ltr">I’m not the only one who has seen the benefits of using Hab Shifa’s Black Seed oil products either.</p> <p dir="ltr">After searching for a product to help with dryness and cracking - a problem made all the worse due to increased hand-washing during the COVID-19 pandemic - nurse Margie Ryan has since made the moisturiser her go-to product, even over pharmaceutical and heavy-duty products.</p> <p dir="ltr">She says the moisturiser absorbs well and that it doesn’t feel like oils are transferred, and recommends it for anyone who works in industries where their hands are frequently in water or where they are prone to dryness or cracking.</p> <p dir="ltr">The Hab Shifa Black Seed skin and hair care range consists of the <a href="https://habshifa.com.au/collections/nourishment-tq/products/black-seed-nurturing-shampoo-1" target="_blank" rel="noopener">Nurturing Shampoo</a> and <a href="https://habshifa.com.au/collections/nourishment-tq/products/black-seed-nurturing-conditioner" target="_blank" rel="noopener">Nurturing Conditioner</a>, the <a href="https://habshifa.com.au/collections/nourishment-tq/products/black-seed-revitalizing-body-wash" target="_blank" rel="noopener">Revitalizing Body Wash</a>, and the <a href="https://habshifa.com.au/collections/nourishment-tq/products/black-seed-hydrating-moisturizing-lotion" target="_blank" rel="noopener">Hydrating Moisturizing Lotion</a>, which retail for $19.95 each or can be purchased as <a href="https://habshifa.com.au/collections/gift-packs/products/gift-of-beauty-gift-pack" target="_blank" rel="noopener">a bundle</a> for $77.50 on Hab Shifa’s online store.</p> <p dir="ltr">To find their products in-store, head <a href="https://habshifa.com.au/pages/store-locator" target="_blank" rel="noopener">here</a> to locate your closest one.</p> <p dir="ltr"><span id="docs-internal-guid-dd856881-7fff-150d-3a26-2cdd567f32d9"></span></p> <p dir="ltr"><em>Image: Getty Images</em></p>

Beauty & Style

Placeholder Content Image

Kyrgios' best chance as top seeds tumble at the US Open

<p>The tennis world is in shock after three of the top 10 male stars have tumbled at the US Open in the beginning round. </p> <p>Dominic Thiem (4), Stefanos Tsitsipas (8) and Roberto Bautista Agut (10) all faced unthinkable lossed in New York on Tuesday. </p> <p>World number 43, Russian Audrey Rublev upset eighth-seeded Tsitsipas on 6-4, 6-7(5), 7-6(7), 7-5 Tuesday and knocked him out and will go on to the second round. </p> <p>Fourth seed Dominic Thiem, who was dubbed the young gun, went down in four sets to Italy’s Thomas Fabbiano 6-4 3-6 6-3 6-2 - meaning Gael Monfils is the highest-ranked player remaining in his quarter of the draw. </p> <p>What left crowds stunned was the death of 10th seed Roberto Bautista Agut. </p> <p>The Spanish star made it to the quarter finals of the Australian Open and the semi-finals at Wimbledon this year, however he fell five sets to Mikhail Kukushkin 3-6 6-1 6-4 3-6 6-3.</p> <blockquote class="twitter-tweet"> <p dir="ltr">alright, people. Thiem, Tsitsipas, and RBA all gone. who is making the semifinals out of one of the wildest Grand Slam sections of all time? <a href="https://t.co/K7jdLR5lO0">pic.twitter.com/K7jdLR5lO0</a></p> — Ricky Dimon (@Dimonator) <a href="https://twitter.com/Dimonator/status/1166463262961131520?ref_src=twsrc%5Etfw">August 27, 2019</a></blockquote> <p>Thiem and Tsitsipas’ incredible losses meant they both had first-round defeats in back-to-back grand slams - similarly to Wimbledon.</p> <p>Nick Kyrgios who is one of the toughest opponents, will continue on to compete for the championship title. </p> <p>The 24-year-old Australian has an even wider door to make it to a major semifinal. </p> <p>The knock out of three of the top ten seeds in the opening rounds could mean Nadal's path to the US open crown becomes much easier.</p>

International Travel

Placeholder Content Image

Try this healthy chia seed pudding

<p>Time to prepare 10 (+ 3 hours refrigeration) mins | Serves 4</p> <p>Recipe courtesy <a href="https://www.wyza.com.au/ahealthyview.com.au">A Healthy View,</a> by Holly Hedge.</p> <p>Chocolate pudding for breakfast? Yes! This chia seed pudding is super yummy, quick and full of fibre which keeps you full for longer. The coconut milk is a good fat and is the ONLY fat that our body recognises straight away and can use as brain fuel. </p> <p><strong>Ingredients</strong></p> <ul> <li>1 1/2 cups Coconut milk ( or 1 cup coconut milk, 1/2 cup almond milk)</li> <li>6 tbsp Chia Seeds</li> <li>5 Dates, chopped</li> <li>1 tsp Vanilla</li> </ul> <p><strong>Flavours – choose one of:</strong></p> <ul> <li>Lime – juice of 1 lime</li> <li>Chocolate – 1 1/2 tblsp cacao powder</li> <li>Coconut – 4 tbsp shredded coconut</li> <li>Berry – handful frozen berries</li> </ul> <p><strong>Method</strong></p> <p>1. Blend all ingredients, besides chia, in blender until well combined. Add chia and blend for 5 seconds</p> <p>2. Pour into jars or containers</p> <p>3. Crush almonds/berries/coconuts and pour over the top</p> <p>4. Refrigerate for at least 3 hours and enjoy cold</p> <p><strong>Tips</strong></p> <p>Mix up the recipe and pour your pudding into a smoothie for a thick and nutrient dense drink on the go.</p> <p>Experiment with the different flavours above to change the taste.</p> <p><em>Republished with permission of <a href="https://www.wyza.com.au/recipes/chia-seed-pudding.aspx">Wyza.com.au.</a></em></p>

Food & Wine

Placeholder Content Image

Guide to planting 6 popular vegetable seeds

<p>There is nothing quite like the taste of enjoying your <a href="https://shop.oversixty.com.au/collections/gardening/products/dtbrown-all-year-round-popular-vegetables-seed-pack?utm_source=Over60&amp;utm_medium=in-article-link-gardening-popular-vegetable-seeds&amp;utm_campaign=Over60Shop&amp;utm_content" target="_blank"><strong><span style="text-decoration: underline;">home-grown produce</span></strong></a> in one of your favourite meals. Here are our tips to growing healthy and delicious vegetables.</p> <p><span style="text-decoration: underline;"><strong>1. Beetroot</strong></span></p> <p>Beetroot is an old favourite which can be served cold in salad or hot with a white sauce.</p> <p><strong>When to plant: </strong>Early Spring through to early Autumn.</p> <p><strong>How to grow:</strong> Prefers a well-cultivated soil. Sow thinly and cover lightly with 12mm of fine soil, gently press. Prefers a well-cultivated soil. Space 30cm between rows. Thin out to 10cm apart when plants are at two to four leaf stage. Water regularly. From crop continuity, sow at intervals of four to six weeks. Apply liquid fertiliser fortnightly. Suitable for deep freezing.</p> <p><strong>Harvest:</strong> 10 weeks</p> <p><span style="text-decoration: underline;"><strong>2. Cabbage Sugarloaf</strong></span></p> <p>Sugarloaf is a popular home-grown vegetable choice which produces conical heads with superb flavour and weighing up to three kilos. This cabbage can be served cooked or used as a salad vegetable.</p> <p><strong>When to plant:</strong> Early Spring to early Autumn.</p> <p><strong>Location:</strong> Prefers rich, well-prepared soil.</p> <p><strong>How to grow:</strong> Sow 5mm deep in punnets, seed boxes or direct in to a garden bed. Keep moist. Transplant 45 to 60cm apart to final growing position when seedlings are large enough to handle. Seedlings usually appear in six to 10 days.</p> <p><strong>Harvest:</strong> Eight to 14 weeks when the heads are firm and small.</p> <p><strong><span style="text-decoration: underline;">3. Carrot Baby</span></strong></p> <p>Carrot baby is delicious, sweet and packed with flavour. This vegetable is an excellent baby or finger carrot, with smooth cylindrical roots.</p> <p><strong>When to plant:</strong> Early Spring to Autumn.</p> <p><strong>Location:</strong> Prefers an open, airy situation with light, fertile soil, not recently manured.</p> <p><strong>How to grow: </strong>Sow 5mm deep direct in to a garden bed. Keep moist. Thin out to 25mm (1”) apart. For continuity, sow every two weeks. Seedlings usually appear in 10 to 21 days.</p> <p><strong>Harvest:</strong> 10 to 12 weeks. Suitable for freezing.</p> <p><span style="text-decoration: underline;"><strong>4. Celery Crisp and Tender</strong></span></p> <p>Celery has a delicious sweet flavour and has good disease resistance. Celery sticks are crisp and stringless requiring little attention.</p> <p><strong>When to plant:</strong> Spring to Autumn.</p> <p><strong>Location:</strong> Celery likes a rich, moisture retentive soil and a sunny position.</p> <p><strong>How to grow</strong>: Sow 5mm deep in punnets, seed boxes or direct in to a garden bed. Keep moist. When seedlings are large enough to handle transplant in final growing position in blocks 25cm apart. Seedlings usually appear in 14 to 21 days.</p> <p><strong>Care:</strong> Keep well-watered and fed to aid quick growth. Remove any side shoots forming at the base of the plant.</p> <p><strong>Harvest: </strong>12 to 14 weeks. Cut blanched celery plant at ground level.</p> <p><span style="text-decoration: underline;"><strong>5. Parsnip Hollow Crown</strong></span></p> <p>A popular variety combining exhibition quality with fine flavour. The tapered roots are conical, long, white and very uniform.</p> <p><strong>When to plant:</strong> All year except Winter.</p> <p><strong>Location: </strong>Prefers an open sunny situation and friable, well-drained soil.</p> <p><strong>How to grow:</strong> Sow 5mm deep direct in to a garden bed. Keep moist. Sow thickly as germination can be irregular. Thin out gradually to 25cm apart. For continuity, sow every two weeks. Seedlings usually appear in 21 to 28 days. Space rows 45cm apart.</p> <p><strong>Harvest:</strong> 18 to 20 weeks. Roots should be pulled while young and tender.</p> <p><span style="text-decoration: underline;"><strong>6. Snow Peas</strong></span></p> <p>A delicious, sweet tasting pea that can be cooked and eaten whole.</p> <p><strong>When to plant:</strong> Autumn through to Spring.</p> <p><strong>Location:</strong> Well-prepared, rich soil and sunny situation.</p> <p><strong>How to grow:</strong> Sow seeds 2cm deep and 5cm apart in flat trenches, 15cm wide. Fill trenches with soil and gently firm down. Space rows 45cm apart. Seedlings emerge in seven to 10 days.</p> <p><strong>Care:</strong> Support plants with sticks to aid growth. During early stage of growth protect crop from birds. Keep well-watered. Suitable for deep freezing.</p> <p><strong>Harvest:</strong> 14 weeks. For best flavour cook immediately after picking.</p> <p>What are your favourite vegetables to grow? Let us know in the comments below.</p> <p><em><strong>To find vegetable seeds, including the vegetables mentioned above, <a href="https://shop.oversixty.com.au/?utm_source=over60&amp;utm_campaign=Over60Shop&amp;utm_medium=in-article-link-gardening&amp;utm_content=over60-shop" target="_blank"><span style="text-decoration: underline;">head to the Over60 Shop</span></a> for high-quality offerings.</strong></em></p>

Home & Garden

Placeholder Content Image

8 recycled materials to grow seeds in

<p>There’s no need to buy seed starting kits or fancy pots when all you need is seeds, potting soil and whatever you have lying around the house – and we guarantee you’ll have a few these in your home.</p> <p>1. Newspapers</p> <p><img style="display: block; margin-left: auto; margin-right: auto;" src="https://oversixtydev.blob.core.windows.net/media/8997/1_500x375.jpg" alt="1 (55)" width="500" height="375" /></p> <p>2. Egg cartons</p> <p><img style="display: block; margin-left: auto; margin-right: auto;" src="https://oversixtydev.blob.core.windows.net/media/8998/2_500x375.jpg" alt="2 (58)" width="500" height="375" /></p> <p>3. Egg shells</p> <p><img style="display: block; margin-left: auto; margin-right: auto;" src="https://oversixtydev.blob.core.windows.net/media/8999/3_500x333.jpg" alt="3 (54)" width="500" height="333" /></p> <p>4. Takeaway coffee cups</p> <p><img style="display: block; margin-left: auto; margin-right: auto;" src="https://oversixtydev.blob.core.windows.net/media/9000/4_500x500.jpg" alt="4 (51)" width="500" height="500" /></p> <p>5. Toilet paper rolls</p> <p><img style="display: block; margin-left: auto; margin-right: auto;" src="https://oversixtydev.blob.core.windows.net/media/9002/5_500x334.jpg" alt="5 (49)" width="500" height="334" /></p> <p>6. Juice cartons</p> <p><img style="display: block; margin-left: auto; margin-right: auto;" src="https://oversixtydev.blob.core.windows.net/media/9001/6_500x373.jpg" alt="6 (48)" width="500" height="373" /></p> <p>7. Cans</p> <p><img style="display: block; margin-left: auto; margin-right: auto;" src="https://oversixtydev.blob.core.windows.net/media/9003/7_500x500.jpg" alt="7 (43)" width="500" height="500" /></p> <p>8. Water bottles</p> <p><img style="display: block; margin-left: auto; margin-right: auto;" src="https://oversixtydev.blob.core.windows.net/media/9004/8_500x333.jpg" alt="8 (43)" width="500" height="333" /></p> <p><em>Image sources: Pinterest</em></p> <p><strong>Related links:</strong></p> <p><em><span style="text-decoration: underline;"><strong><a href="/lifestyle/gardening/2015/08/diy-self-watering-planter/">How to make a self-watering planter</a></strong></span></em></p> <p><em><span style="text-decoration: underline;"><strong><a href="/lifestyle/gardening/2015/08/test-if-seeds-can-be-planted/">Are those seeds viable for planting?</a></strong></span></em></p> <p><em><span style="text-decoration: underline;"><strong><a href="/lifestyle/gardening/2015/08/how-to-choose-plants-at-nursery/">What you need to know to choose the best plants at the nursery</a></strong></span></em></p>

Home & Garden

Placeholder Content Image

Seared lemongrass tuna with rice paper, herbs, grated egg and basil seeds

<p>If you need a light, delicious dinner try this seared lemongrass tuna with rice paper, herbs, grated egg and basil seeds.</p> <p>Sounds pretty tasty to us!</p> <p><strong><span style="text-decoration: underline;">Ingredients:</span></strong></p> <ul> <li>1 thick lemongrass stem, pale end finely sliced</li> <li>3 garlic cloves, chopped</li> <li>½ tsp Chinese five-spice</li> <li>1 tbsp salt flakes</li> <li>½ tsp freshly ground black pepper</li> <li>700g mid-loin tuna, trimmed and cut lengthways into two pieces</li> <li>80ml grapeseed oil</li> <li>1 white salad onion, finely sliced in half-moons</li> <li>1½ tbsp basil seeds, soaked in cold water for 20 minutes and drained</li> <li>1 lemon, peeled, segmented and chopped</li> <li>4 hard-boiled egg yolks</li> <li>½ bunch Thai basil, leaves picked</li> <li>½ bunch dill fronds, leaves picked</li> <li>½ bunch coriander, leaves picked</li> <li>½ bunch Vietnamese mint, leaves picked</li> <li>2 handfuls lemon balm, leaves picked</li> <li>2 long green chillies, finely sliced</li> <li>lime wedges, to serve</li> <li>black sesame crackers or large prawn crackers, to serve</li> <li>superfine rectangles of rice paper, cut into triangles, to serve (if these are hard to find you could just use the prawn crackers or lettuce cups, or try lightly moistening spring roll wrappers with a damp cloth)</li> </ul> <p><em>Dipping sauce</em></p> <ul> <li>4 small garlic cloves, chopped</li> <li>4 red bird's eye chillies, chopped</li> <li>3 tbsp lime juice<br /> 3½ tbsp Vietnamese fish sauce</li> <li>3 tbsp white sugar</li> </ul> <p><strong><span style="text-decoration: underline;">Method:</span></strong></p> <ol> <li>Pound the lemongrass and garlic using a mortar and pestle until an even paste.</li> <li>Add the five-spice, salt and pepper and combine. Smear the paste evenly over the tuna, pressing it on firmly.</li> <li>Add the oil to a frying pan over medium heat and sear the tuna pieces evenly for about one minute on each side.</li> <li>Set aside to cool, and then wrap tightly in cling film. Refrigerate until chilled.</li> <li>For the dipping sauce, pound the garlic and chilli using a mortar and pestle until a rough paste. Add the lime juice, fish sauce and sugar and mix until the sugar has dissolved.</li> <li>This will need to sit for about five minutes before using.</li> <li>Once chilled, cut the tuna into slices about five millimetres thick – don't slice it too thinly – and arrange on a serving platter.</li> <li>Top with the onion, basil seeds and chopped lemon and grate over the egg yolks.</li> <li>Combine the herbs and green chilli and pile onto a platter with the dipping sauce, lime wedges, rice paper and crackers on the side.</li> <li>Drizzle some of the sauce over the tuna and serve.</li> </ol> <p><em><strong>Written by Karen Martini. First appeared on</strong> </em><a href="http://www.stuff.co.nz/" target="_blank"><span style="text-decoration: underline;"><em><strong>Stuff.co.nz.</strong></em></span></a></p> <p><em><strong>Have you ordered your copy of the Over60 cookbook, The Way Mum Made It, yet? Featuring 178 delicious tried-and-true recipes from you, the Over60 community, and your favourites that have appeared on the Over60 website,</strong></em> <span style="text-decoration: underline;"><em><strong><a href="https://shop.abc.net.au/products/way-mum-made-it-pbk" target="_blank">head to the abcshop.com.au to order your copy now.</a></strong></em></span></p> <p><strong>Related links:</strong></p> <p><span style="text-decoration: underline;"><strong><em><a href="/lifestyle/food-wine/2015/10/chicken-alfredo-fettucine/">Creamy chicken Alfredo pasta</a></em></strong></span></p> <p><span style="text-decoration: underline;"><strong><em><a href="/lifestyle/food-wine/2015/10/broccoli-zucchini-quiche/">Broccoli, parmesan and zucchini quiche</a></em></strong></span></p> <p><span style="text-decoration: underline;"><strong><em><a href="/lifestyle/food-wine/2015/05/cheesy-pea-and-pesto-pasta/">Cheesy pea and pesto</a><a href="/lifestyle/food-wine/2015/05/cheesy-pea-and-pesto-pasta/"> pasta</a></em></strong></span></p>

Food & Wine

Placeholder Content Image

Lemon and poppy seed muffins

<p>Tangy and sweet, these moist muffins make a great snack or addition to your tea.</p> <p><span style="text-decoration: underline;"><strong>Serves</strong></span>: 10-12</p> <p><strong><span style="text-decoration: underline;">Ingredients: </span></strong></p> <ul> <li>½ cup of sweet butter, softened</li> <li>⅔ cup of sugar</li> <li>2 eggs, separated</li> <li>1 ⅓ cups of self-raising flour</li> <li>Zest of 2 lemons, grated</li> <li>½ cup of buttermilk or plain yogurt</li> <li>2 tablespoons of lemon juice</li> <li>1 teaspoon of vanilla extract</li> </ul> <p><strong><span style="text-decoration: underline;">Method:</span></strong></p> <p>1. Preheat oven to 175°C and spray a muffin tin.</p> <p>2. In a bowl, add cream, butter and sugar and cream until mixture if fluffy.</p> <p>2. Add two egg yolks and beat into mix.</p> <p>3. In another bowl, mix together flour, poppy seeds and lemon zest.</p> <p>4. Add to cream mix, plus buttermilk, lemon juice and vanilla, mixing between each addition.</p> <p>5. Separately, beat egg white forming soft peaks. Add to batter and mix.</p> <p>6. Pour batter into muffin tin. Bake for 20 to 25 minutes. Let cool.</p> <p><strong>Related links:</strong></p> <p><a href="http://www.oversixty.co.nz/lifestyle/food-wine/2015/11/flourless-hazelnut-chocolate-cake/"><span style="text-decoration: underline;"><em><strong>Flourless hazelnut chocolate cake</strong></em></span></a></p> <p><a href="http://www.oversixty.co.nz/lifestyle/food-wine/2015/11/banana-date-and-walnut-cake/"><span style="text-decoration: underline;"><em><strong>Banana, date and walnut cake with cream cheese icing</strong></em></span></a></p> <p><a href="http://www.oversixty.co.nz/lifestyle/food-wine/2015/11/chocolate-chip-blondies/"><span style="text-decoration: underline;"><em><strong>Chocolate chip blondies</strong></em></span></a></p>

Food & Wine

Placeholder Content Image

Traditional poppy seed roll

<p>Fill your kitchen with the aroma of this soft, sweet, Eastern European bread.</p> <p><strong><span style="text-decoration: underline;">Ingredients:</span></strong></p> <ul> <li>0.25kg of poppy seeds</li> <li>¾ cup of sugar + 2 tablespoons extra</li> <li>1 tablespoon of butter, melted</li> <li>1 teaspoon of lemon juice</li> <li>½ cup of milk, hot</li> <li>7g of active dry yeast</li> <li>½ cup of warm water</li> <li>2 cups of flour</li> <li>½ teaspoon of salt</li> <li>¼ cup of butter</li> <li>1 egg, separated</li> </ul> <p><strong><span style="text-decoration: underline;">Method:</span></strong></p> <p>1. In a food processor, process seeds for one minute.</p> <p>2. In a bowl, mix seeds, ¾ cup of sugar, melted butter, lemon juice and milk and stir to create a filling. Let chill.</p> <p>3. Mix yeast with water and remaining sugar. Let sit until yeast forms a layer.</p> <p>4. In a bowl, mix flour, salt and ¼ cup of butter until crumbed.</p> <p>5. Add yeast and egg yolk to crumb mixture, saving the egg white. Stir until a dough forms.</p> <p>6. On a floured surface, knead dough for about five minutes or until smooth.</p> <p>7. Divide dough in half. Roll each half into 30cm x 40cm rectangles.</p> <p>8. Spread chilled poppy seed filling over top each half, reserving a 2-3cm border around each. Fold all sides of the border inward over the filling, pressing.</p> <p>9. Roll the dough length-wise forming a roll, repeating for both. In order to stop filling leakage, pinch and tuck ends.</p> <p>10. Place rolls, seamed side down on a lined baking sheet and let sit for one hour.</p> <p>11. Preheat oven to 175°C.</p> <p>12. Beat reserved eggwhite and brush over rolls.</p> <p>13. Bake for 30 to 40 minutes. Remove and cover with a cloth and let cool completely. Cut to serve.</p>

Food & Wine

Placeholder Content Image

How to sterilise soil for new seeds

<p>That pile of soil that you used to grow winters crop of plants is about ready for a revamp before the warmer weather really sets in. Soil, especially soil which has been used for a couple of growing seasons can harbor pests, diseases and the seeds of weeds, even if you’ve been rigorous about plucking them out. To ensure a healthy, happy garden bed it’s a good idea to sterilise your soil before a new season of planting. Here are three ways to do it:</p> <p><strong>1. Sterilising with steam</strong></p> <p>Steaming is the optimum way to sterilise potting soil, as the steam will kill anything living in the soil. Steaming can be carried out using a pressure cooker or sterilising container.</p> <ul> <li>Using a pressure cooker: Pour three to four cups of water into your cooker and place shallow pans of soil over the top of the rack. Cover with foil and close the lid. It’s important to leave the steam valve open enough to allow steam to escape. Heat for 15 to 30 minutes.</li> <li>To sterilise without a pressure cooker: Pour 10cm of water into a sterilising container. Place soil filled, foiled covered pans on a rack over the water. Close the lid and bring to a boil, allowing a small gap for steam to escape. Continue boiling for 30 minutes then allow to cool.</li> </ul> <p><strong>2. Sterilising using the oven</strong></p> <p>To sterilise with your oven, put some soil in an oven safe container and cover with foil. Using a heat safe thermometer, bake at 80 to 90°C for 30 minutes or until soil reaches around 82°C. Remove from oven and allow to cool.</p> <p><strong>3. Sterilising using a microwave</strong></p> <p>To sterilise using the microwave, fill a clean microwave safe container with moist soil and cover with a lid. Add a few ventilation holes. Heat the soil for 90 seconds for batch on full power. Allow to cool and leave in container till ready to use.</p> <p><strong>Related links: </strong></p> <p><span style="text-decoration: underline;"><strong><em><a href="/lifestyle/gardening/2015/08/diy-self-watering-planter/">How to make a self-watering planter</a></em></strong></span></p> <p><span style="text-decoration: underline;"><strong><em><a href="/lifestyle/gardening/2015/08/test-if-seeds-can-be-planted/">Are those seeds viable for planting?</a></em></strong></span></p> <p><span style="text-decoration: underline;"><strong><em><a href="/lifestyle/gardening/2015/08/how-to-choose-plants-at-nursery/">What you need to know to choose the best plants at the nursery</a></em></strong></span></p>

Home & Garden

Placeholder Content Image

Are those seeds viable for planting?

<p>Do you have leftover seeds lying around the house that you haven’t manage to plant yet? This simple test will help you figure out if they’re still good to plant, so you never waste your time on seeds that will never sprout, or worse, throw out perfectly good seeds.</p> <p>1. Wet a paper towel and then ring it out so it's only damp.</p> <p>2. Place three to four seeds on top of the paper towel. Place towel with seeds on it in a plastic bag to keep moisture in.</p> <p>3. Place plastic bag with seeds in it somewhere warm. For example, sunny window sill or on top of dryer.</p> <p>4. Wait at least three days and check if seeds have sprouted.</p> <p>If seeds have not sprouted within this time, the seeds have most likely gone bad and should not be planted. If the seeds have sprouted you can use them for planting. Happy gardening!</p> <p>Source: <a href="http://food52.com/blog/12744-how-to-know-if-your-seeds-are-viable-for-planting" target="_blank">Food52</a></p> <p><strong>Related links:</strong></p> <p><span style="text-decoration: underline;"><em><strong><a href="/lifestyle/gardening/2015/07/eight-garden-seed-tips/">8 things to know before buying garden seeds</a></strong></em></span></p> <p><span style="text-decoration: underline;"><em><strong><a href="/lifestyle/gardening/2015/07/improve-soil-without-compost/">How to improve your soil without a compost heap</a></strong></em></span></p> <p><span style="text-decoration: underline;"><em><strong><a href="/lifestyle/gardening/2015/08/diy-garden-planters/">8 DIY garden planters</a></strong></em></span></p>

Home & Garden

Placeholder Content Image

8 things to know before buying garden seeds

<p>When the season comes to plant your garden, growing your flowers and vegetables from seeds has its advantages: it’s cheaper and you can find a larger variety of seeds than fully-grown plants. You also have the satisfaction of knowing the quality and health of your plants as a result of the hard work you put in. But when it comes to actually buying seeds, here are some things you should first consider.</p> <p><strong>1. Buy trusted brands</strong></p> <p>Just like clothes, food, appliances or just about anything else you buy today, you probably have certain brands you trust. This should be no different when it comes to your seeds. Make sure you only buy reputable seed brands with a reputation for good seed quality. Try to avoid no-name seeds when possible; you might save in dollars, but lose in flower/vegetable quality. Not all seeds are made equal.</p> <p><strong>2. Buy more than you need</strong></p> <p>If you’re planting a vegetable garden, certain vegetables such as radishes or spinach have a high turnover rate. Rather than leave their space empty, after harvesting your first crop, you can plant more throughout the season. Check the days until harvest estimation on your seed packages for further insight.</p> <p><strong>3. Do your research</strong></p> <p>Make sure you read the product label and do your research online before choosing a plant seed. Many flowers require special soil and care or need to be planted indoors to develop before being placed outside. It would be a shame to waste your work and hard-earned dollars due to poor foresight, so know what is needed before you commit to a seed.</p> <p><strong>4. Don’t over-do it</strong></p> <p>If you’re looking to start a vegetable garden but you have limited space, choose smaller vegetables such as carrots, radishes, or spinach as opposed to larger vegetables that will take up all of the room. Unless you intend to eat pumpkin exclusively, steer clear of bigger fruit and vegetables until you have room to expand your garden.</p> <p><strong>5. Think about your seed size</strong></p> <p>Many smaller seeds need to be planted in small containers initially in order to better control their environment whilst the seedling is fragile. If you want to plant directly into your garden bed to start, try bigger, hardier seeds such as beans and peas, as they do not require the initial step that other varieties might.</p> <p><strong>6. Know the life of your seeds</strong></p> <p>Some vegetables, such as leeks, corn and rhubarb have a short bed-life, while others, such as eggplant, beets and melons have been known to survive for over five years. Decide how often you wish to change and replant your garden and take this into consideration when selecting your seeds.</p> <p><strong>7. Consider diseases</strong></p> <p>Many types of plants can be prone to diseases, and this can devastate your entire vegetable yield or flower bed population. Check the labels when you purchase, and aim to buy disease-resistant varieties of seed. </p> <p><strong>8. Check online</strong></p> <p>Many seeds can be found online for cheaper than you might find in store. By spending a bit of time searching reputable online sellers, you can save time and money and have your seeds show up right at your door.</p> <p><strong>Related links:</strong></p> <p><em><strong><a href="/lifestyle/outdoors/2015/02/plants-for-shade/"><span style="text-decoration: underline;">The best plants for a shady backyard</span></a></strong></em></p> <p><em><strong><span style="text-decoration: underline;"> <a href="/lifestyle/outdoors/2015/01/companion-planting/">Why you should be “companion planting” in your garden</a></span></strong></em></p> <p><em><strong><a href="/lifestyle/outdoors/2015/01/gardening-tips-part-2/"><span style="text-decoration: underline;">Part 2: Over60 community gardeners’ top tips</span></a></strong></em></p>

Home & Garden

Placeholder Content Image

Vanilla orange and poppy seed cake

<p>This classic poppy seed cake is made even more delicious by the addition of orange and vanilla icing.</p><p><strong><span style="text-decoration: underline;">Ingredients:</span></strong></p><ul><li>250g of butter, plus extra to grease</li><li>½ cup of fresh squeezed orange juice</li><li>½ cup of Greek yogurt</li><li>¼ cup of poppy seeds</li><li>1 ¼ cups of caster sugar</li><li>2 tablespoons of orange rind, finely grated</li><li>4 eggs</li><li>2 ¼ cups of self-raising flour</li></ul><p><em>Icing</em></p><ul><li>125g of butter</li><li>2 ½ cup of icing sugar</li><li>1 pinch of salt</li><li>2 tablespoons of fresh orange juice</li><li>2 tablespoons of maple syrup</li><li>2 teaspoons of vanilla extract</li></ul><p><strong><span style="text-decoration: underline;">Method: </span></strong></p><p>1. After preheating your oven to 160°C, grease a round cake pan with butter.</p><p>2. In a bowl, mix orange juice, yogurt and poppy seeds.</p><p>3. In a large bowl, using an electric mixer beat butter, sugar and orange rind until creamy. Add eggs and continue to combine.</p><p>4. Add flour, baking powder, and poppy seed mixture and fold together.</p><p>5. Pour into pan, smoothing the surface. Bake for one hour or until cooked through. Let cool.</p><p>6. To make icing, beat butter in a large bowl. Add icing sugar and salt and beat until smooth. Add orange juice, maple syrup and vanilla and beat until creamy. Spread over cake.</p><p><strong>Related links:</strong></p><p><span style="text-decoration: underline;"><em><strong><a href="/lifestyle/food-wine/2015/08/almond-carrot-orange-cake/">Almond, carrot and orange cake</a></strong></em></span></p><p><span style="text-decoration: underline;"><em><strong><a href="/lifestyle/food-wine/2015/06/carrot-cake-cookies/">Carrot cake cookie sandwiches</a></strong></em></span></p><p><span style="text-decoration: underline;"><em><strong><a href="/%20http:/www.oversixty.com.au/lifestyle/food-wine/2015/05/lemon-polenta-cake/">Gluten-free lemon cake</a></strong></em></span></p>

Food & Wine

Placeholder Content Image

Lime, coconut and poppy seed cake

<p>Spring is here and the I Quit Sugar team has developed the perfect sugar-free cake that will please the pickiest of eaters. This "Lime, coconut and poppy seed cake with zesty coconut butter" is so moist and light. Perfect with a cup of tea, which is how we tend to enjoy it.</p><p><strong>Preparation time:</strong> 10 minutes</p><p><strong>Cooking time:</strong> Three to three-and-a-half hours</p><p><strong>Serves:</strong> 10</p><p><strong>Cake ingredients</strong></p><ul><li>1 ½ cups of almond meal</li><li>1 cup gluten-free, self-raising flour</li><li>1 teaspoon gluten-free baking powder</li><li>½ teaspoon sea salt</li><li>125g unsalted butter, at room temperature</li><li>½ cup rice malt syrup</li><li>2 eggs</li><li>zest and juice of 1 lime</li><li>1 teaspoon poppy seeds</li></ul><p><strong>Zesty coconut butter ingredients</strong></p><ul><li>2 cups desiccated coconut</li><li>juice and zest of half a lime</li></ul><p><strong>Method for cake:</strong></p><ol><li>Grease and line the slow cooker insert with baking paper so that it reaches half way up
the edges of the interior.</li><li>In a medium bowl combine almond meal, flour, baking powder and salt Set aside.</li><li>In a separate bowl add butter and rice malt syrup. Beat using an electric beater until smooth and combined. Beat in eggs one at a time until creamy. Add lime juice and zest and beat on low until smooth. Add the flour mixture and continue to beat until smooth. Fold through poppy seeds.</li><li>Pour cake batter into slow cooker. Cover and cook on low for 3 – 3 ½ hours on high for 1 ½ - 2 hours until a toothpick inserted into the centre comes out clean. The edges of the cake should be browned and starting to pull away from the sides.</li><li>Allow cake to cool for 20 minutes in the slow cooker, and then lift out by pulling on the baking paper.</li><li>Cut cake into slices and serve warm with Zesty Coconut Butter, if you like.</li></ol><p><strong>Method for zesty coconut butter: </strong></p><ol><li>Blend coconut until it forms a spreadable mixture. This can take up to 10 minutes depending on your blender.</li><li>Stir through the juice of half a lime. Add some zest if you like it extra citrusy.</li></ol><p><em><strong>This recipe is originally from Sarah Wilson's, <a href="http://store.iquitsugar.com/i-quit-sugar-slowcooker-cookbook-digital/" target="_blank">I Quit Sugar Slow Cooker Cookbook</a>, which can be purchased online at <a href="http://iquitsugar.com/" target="_blank">IQuitSugar.com</a>.</strong></em>&nbsp;</p><p>Sarah Wilson is a New York Times best-selling author and blogger whose journalism career has spanned 20 years, across television, radio, magazines, newspapers and online. Her books include the best-sellers&nbsp;I Quit Sugar&nbsp;and&nbsp;I Quit Sugar For Life.&nbsp;The popular foodie has also authored the best-selling series of cookbooks from&nbsp;<span style="text-decoration: underline;"><strong><a href="http://iquitsugar.com/" target="_blank">IQuitSugar.com</a></strong></span>. Her 8-Week Program has seen more than 495,000 people quit sugar worldwide.</p>

Food & Wine

Our Partners