Get crafty with Mod Podge and make your own colourful bowls

If you’ve never had the delight of working with Mod Podge, we’re about to make your world a little more fun. Mod Podge is a cool craft glue/sealant/varnish all in one. It will stick to just about anything so the possibilities are endless. Once you’ve finished your project, a light coat of the stuff will seal it all in with a nice sheen.
So, now that you know what it is, what are you going to do with it? How about making a cool DIY bowl to hold your keys, jewellery, spare change, or even lollies. Here are three ideas to get you started.

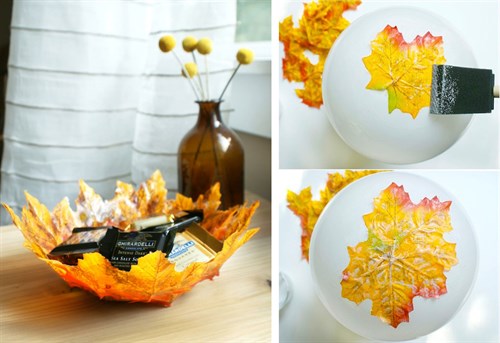
Autumn leaf bowl
What you’ll need:
- Silk/fake autumn leaves (stems and veins removed)
- A balloon
- A bowl or saucepan
- Mod Podge
- A sponge brush
Method:
- Blow up your balloon until the larger end is the size and shape you want your bowl to be.
- Stick your balloon upside down (valve pointing down) in your bowl/saucepan and paint a light layer of Mod Podge onto the surface. Leave this layer to dry – it will form a sort of protective layer between the balloon and your leaves.
- Start sticking your leaves down, using your sponge brush to flatten out and apply more Mod Podge on top.
- Once you have a shape and size you like, add a couple more leaves to the bottom of the bowl to balance the weight evenly, and leave the bowl to dry for at least an hour (if it’s humid where you are, leave it for longer).
- When everything is dry, carefully pop the balloon with a pin prick near the tied end. Slowly let the air out and peel the balloon away.
Source: HelloLucky
Yarn bowl
What you’ll need:
- Cotton yarn
- A bowl (for moulding)
- Large ziplock bag/plastic wrap
- A bowl (for holding the Mod Podge)
- Mod Podge
Method:
- Place the bowl you’re using to as a mould inside your ziplock bag/wrap it in plastic wrap to protect it and place it upside down.
- Pour some Mod Podge into your other bowl and add a little water to dilute it.
- Place your yarn, Mod Podge and mould in a line and dip the yarn into the Mod Podge. Use your fingers to pinch the yarn between your fingers and slide them along the string to squeeze off the excess glue.
- Slowly wind the string back and forth over the mould until you’re happy with the amount of coverage. Gently press down on the yarn to help them adhere to one another and allow everything to dry for at least an hour (overnight would be better).
- When everything is dry, carefully remove the bowl from underneath the plastic wrap/from the ziplock bag and gently peel the plastic from the yarn bowl.
Source: GunnySack
Button bowl
What you’ll need:
- Flat buttons (smaller stick better)
- A balloon
- Mod Podge
- A sponge brush
- A bowl or saucepan
Method:
- Blow up your balloon until the larger end is the size and shape you want your bowl to be.
- Stick your balloon upside down (valve pointing down) in your bowl/saucepan and paint a light layer of Mod Podge onto the surface. Leave this layer to dry – it will form a sort of protective layer between the balloon and your leaves.
- Apply a second coat of Mod Podge and start sticking the buttons down, starting at the top of the balloon and working until you like the look and size. Keep the buttons as close together as you can fit them. Leave it to dry for 4 – 5 hours.
NOTE: If you find your buttons are sliding down the balloon while they dry, turn the balloon upside down (knot in the air) for the drying. - Once this layer is dry, add another layer of Mod Podge and allow to dry overnight.
- When everything is dry, carefully pop the balloon with a pin prick near the tied end. Slowly let the air out and peel the balloon away.
Source: KirstenTool
Related links:
Make colourful button bracelets with the grandkids
Learn to braid paper into bracelets and bookmarks
Pick up your knitting needles and make this simple but beautiful ribbed scarf
